Faxing
Fax Management System – Simple User Guide
We’ve created this simple guide for you to provide to all of your users that will go over the initial basics, like how to view your fax number, how to send a fax, and how to navigate to your fax history.
Accessing the Service
Log into the service: https://fax.voxtandem.com (The username is an authenticated email address and passwords are set up upon first login). Upon FIRST login, you are required to reset the password for security purposes.
Changing the Password
This service uses an username and password unique to the system.
Steps to change the password:
– After you are logged into the service, select your name in the upper right hand corner
– From the drop down menu, select “settings”
– Select Password (located at the top)
– Enter in your current password, and create your new password.
– Select Change
Your Fax Number
Once logged into the portal, your fax number will be listed on the right hand side under “My Fax Numbers”
How to Send a Fax
Log into your account at https://fax.voxtandem.com. This will default you to your “send fax” view.
Steps to send a fax:
– Enter your 10 digit fax destination number in the box next to the flax icon
– You can also use the contact button to select a recipient from your contact list
– Next, select your file you with to upload, drag & drop from your computer, or upload a file from a synced cloud storage account
– Click the Send button. You’ll receive a pop up confirmation that will show the fax is processing
How to View Your History
– From the main page, locate the left side panel
– Select History
– In the top right, choose All
– Here is where you will find all inbound and outbound faxes
– Click on the three dots to the far right to view/print, download, and look at the info of your faxes (this screen will give information into why a particular fax failed)
Need help?
If you need additional help, feel free to contact your admin team directly, or use the in-app support, located in the bottom right hand corner of the Documo portal.
How to send a fax from email
One of the main features of eFax is the ability to send and receive faxes right from your email. Below you will find instructions on how to do this.
Note: This feature will only work from an email address associated with an active account in our system. If you don’t have an eFax with Vox Tandem, please contact your sales representative.
Addressing the email
To send a fax from email, compose a message from your email. In the To: field, type the 11 digit fax number (ex. 18885551212) followed by @faxmail.voxtandem.com.
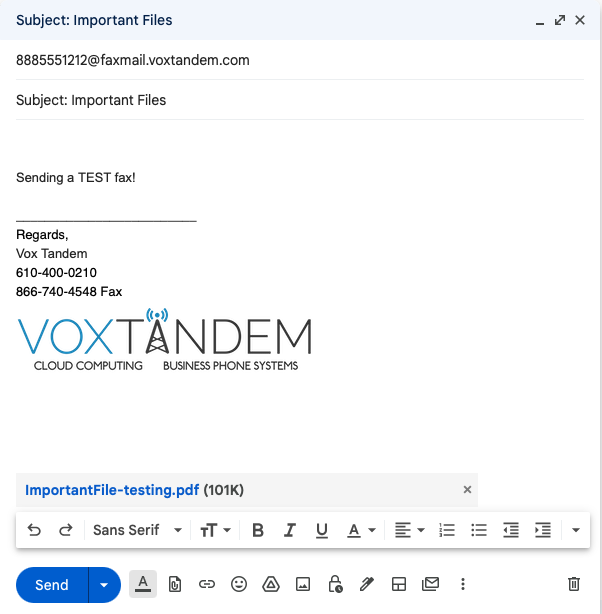
Note: It is important to always use an 11 digit fax number when formatting the email. This means you need to include a “1” for faxing any number in the USA or CANADA. For international faxing, digits will vary but always include the country code.
Faxes sent via email are limited to 10 recipients or less. Attempting to send to more than 10 recipients will result in an error.
Populating info onto a cover page
If you have your cover page setting turned on, eFax will automatically take details from your email and populate it directly onto a cover page. To turn this feature off, click your initials in the bottom left, select “Your Settings” on the left, choose your ‘fax’ tab, and toggle it off:
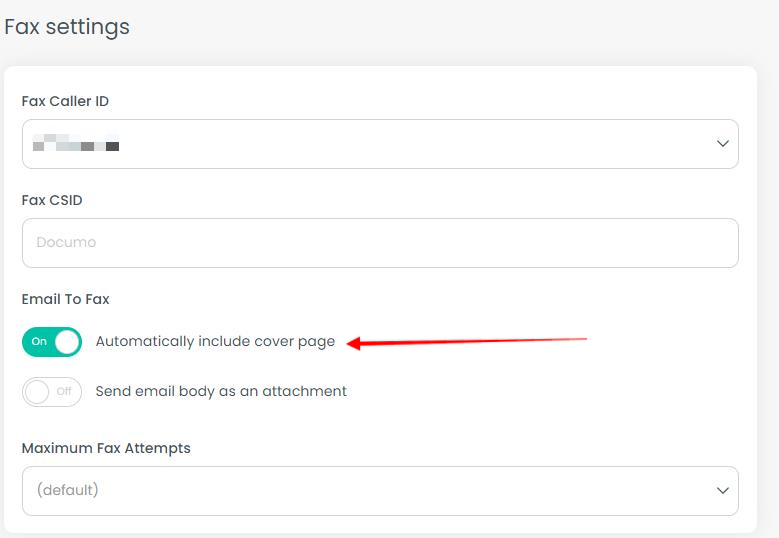
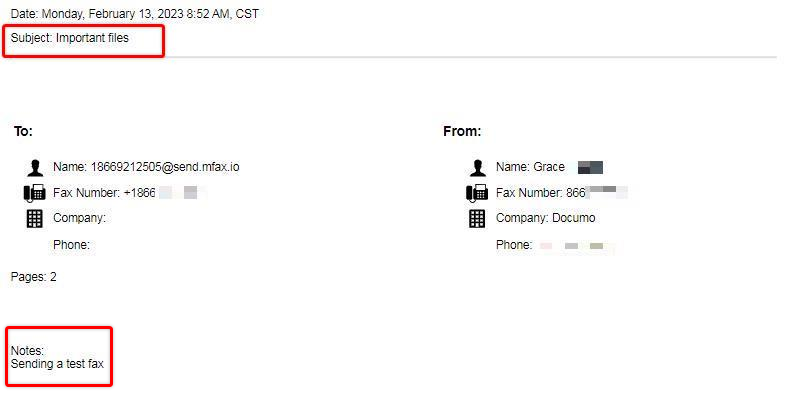
If this setting is enabled, the details you enter into your email will populate onto your cover page:
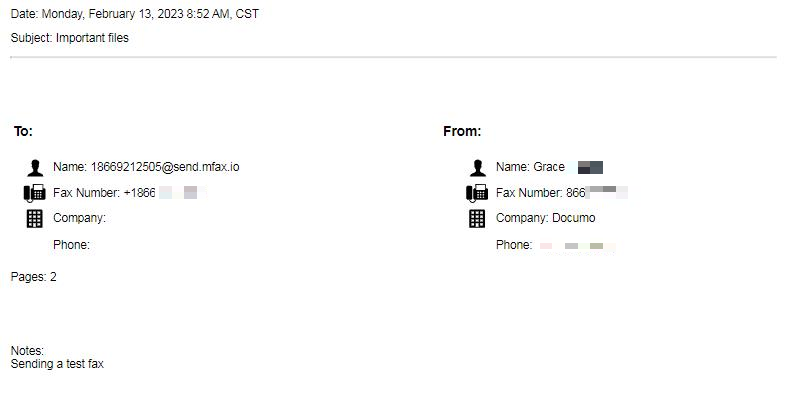
Email subject line will populate RE: field of the cover page. (see screenshot below)
Body of email will populate the Comments field of the cover page. (see screenshot below)
Attach your document to fax
When sending a fax from email you can attach multiple documents types (see below). You can attach a single document or multiple documents (varying formats is fine) and they will be rendered, converted to a faxable format, and sent to your destination fax number. Max file size is 25MB. Max amount of file attachments is 25.
Once your documents are attached, simply hit SEND. That’s it! We’ll take care of the rest.
Allowed Email Attachments:
Adobe Acrobat Documents (PDF)
Microsoft Office Files (DOC, DOCX, XLS, XLXS, PPT, PPTX)
Open Office Files (ODP, ODS, ODT)
Google Files (GDOC, GSLIDES, GSPREADSHEET)
Text Files (TXT, RTF)
Printer Files (PCL, EPS, PS)
Image Files (TIFF, TIF, GIF, PNG, JPEG, JPG)
Other Files (FXC, FODT, HTML)
Tips: If you create a file using a scanner or print to file, always choose the option of black and white for the output.