How To Guides
- Firewall & Router Configuration
- Manually Enable / Disable Night Mode
- 3CX WebMeeting / Video Conferencing
- Using your Desk Phone with 3CX
- Creating an Audio or Video Conference
- Video Conferencing for Advanced Users
- What is an online whiteboard?
- The 3CX Android App: Work Remotely
- The 3CX iOS (APPLE) App: Work Remotely
- Auto Attendant / IVR / Office Hours - Call Routing
- Call Queues & Ring Groups
- Firewall & Router Configuration for 3CX - On-Premise Server
- PBX Dial Codes - How to use them directly from your phone
- Hot Desking
- Managing User / Agents’ Status in Queues
- CALL REPORTS - COMPLETE GUIDE TO 3CX REPORTS
- Downloading your 3CX Video Conference Recording
- Park & Pickup a Parked Call
- How to Manually Override Office Hours in 3CX V20
- Quick Response Templates for SMS & Chat
- Configure Your Office Hours & Holidays
Firewall & Router Configuration
Introduction
If you have 3CX installed on-premise you need to make changes to your firewall configuration to allow 3CX to communicate successfully with your SIP trunks and apps. This guide gives you a general overview of the ports that need to be opened/statically forwarded on your firewall.
If you have remote IP phones, you need to put an SBC or router phone in front of them. Alternatively we recommend the use of our apps which have an inbuilt tunnel.
Ports required for your SIP Trunk / VoIP Provider

Open these ports to allow 3CX to communicate with the VoIP Provider/SIP Trunk and WebRTC:
- Port 5060 (inbound, UDP) and 5060-5061 (inbound, TCP) for SIP communications.
- Port 9000-10999 (inbound, UDP) for RTP (Audio) communications, i.e. the actual call. Each call requires 2 RTP ports, one to control the call and one for the call data, so the number of ports you need to open is double the number of simultaneous calls.
Ports required for remote 3CX Apps & SBC
To allow users to use their 3CX apps remotely, on Android, iOS or Windows, you need to ensure that these ports are open:
- Port 5090 (inbound, UDP and TCP) for the 3CX tunnel.
- Port 443 or 5001 (inbound, TCP) HTTPS for Presence and Provisioning, or the custom HTTPS port you specified.
- Port 443 (outbound, TCP) for Google Android Push.
- Port 443, 2197 and 5223 (outbound, TCP) for Apple iOS Push. More information here.

PUSH messages are sent by the 3CX System to Extensions using smartphones to wake up the devices for calls. This greatly enhances the usability of the smartphone apps.
Ports required for 3CX Video Conference
To create and participate in web-based meetings, the 3CX-hosted cloud service must be able to communicate with the 3CX PBX and vice versa. To do so, these ports need to be configured:

- Port 443 (inbound, TCP) must be allowed for participants to connect your 3CX System
- 3CX System: Port 443 (outbound, TCP) must be allowed to connect to 3CX’s cloud infrastructure
- Users: Port 443 (outbound, TCP) and 48000-65535 (outbound, UDP) must be allowed to exchange audio and video with other participants
Ports required for Other Services (SMTP & Activation)
A 3CX System connects to various services provided by 3CX in the cloud.
- SMTP Service: Cloud Service for SMTP Messages
smtp-proxy.3cx.net, 2528 (outbound, TCP) - Activation Service: Activation of 3CX Products
activate.3cx.com, 443 (outbound, TCP, uninspected traffic) - RPS Service: Provisioning of Remote IP Phones
rps.3cx.com, 443 (outbound, TCP) - Update Server: For updates of 3CX System and firmware of IP Phones
downloads-global.3cx.com, 443 (outbound, TCP)
Configure Split DNS / Hairpin NAT
You will need to configure the 3CX FQDN to work both internally on your local network and externally outside of your network (unless you do not want to give access to your phone system from outside the network).
Disable SIP ALG
Use a router/firewall without a SIP Helper or SIP ALG (Application Layer Gateway), or a device on which SIP ALG can be disabled.
Run the Firewall Checker
After configuring your firewall, run the 3CX Firewall Checker to verify its configuration!
Step by Step Instructions for Popular Firewalls
Example configurations for popular firewalls:
- Configuring a Sonicwall Firewall for 3CX
- Configuring a Draytek 2820 Router for 3CX with QoS configuration
- Configuring AVM FritzBox as a Firewall with 3CX
- Configuring a CISCO router to allow connection to a VOIP provider
- Configuring FortiGate 40F for 3CX
- Configuring a WatchGuard XTM Firewall for 3CX
- Configuring a pfSense Firewall for 3CX
- Configuring MikroTik Firewall
Manually Enable / Disable Night Mode
Force 3CX IN or OUT of Office – Emergency Code
This dial code (which is unspecified by default for security purposes) is a code that when used, will set the entire PBX to either:
- In office hours
- Out of Office hours
- Back to auto switching based on time
This code is designed for emergency services when you need to change the routes of all your VoIP Lines to IN or Out of office quickly with a single phone call.
Usage of this Dial Code
Let us assume that the administrator configures this dial code to be *64 and also assume that the global office hours are set from 9am till 5.30pm.
Setting 3CX to In Office Hours
If the Administrator dials *641 (appends a 1 to the code), a prompt will be played stating that “3CX is now set to IN OFFICE HOURS”. This means that the PBX will disregard the current time, or day (even if it is a holiday) and set all the routes of the Gateways, VoIP Providers and DID/DDI’s to route to the In Office hours destination.
Setting 3CX to Out of Office Hours
If the Administrator dials *642 (appends a 2 to the code), a prompt will be played stating that “3CX is now set to OUT OF OFFICE HOURS”. This means that the PBX will disregard the current time, or day (even if it is 10am for example) and set all the routes of PSTN Gateways, VoIP Providers and DID/DDI’s to route to the Out of Office hours destination.
Setting 3CX to Default Office Hours Operation
If the Administrator dials *64 (with nothing appended), a prompt will be played stating that “3CX is now using the DEFAULT OFFICE HOURS”. This means that in this example, the PBX will override the previous 2 commands and behave as follows – from 9am till 5.30pm lines/ports will be routed to In Office Hours destinations and from 5.31pm till 8.59am, the lines/ports will be routed to the Out of Office hour destinations.
3CX WebMeeting / Video Conferencing
3CX WebMeeting is a powerful tool that allows for effective, face to face communication and collaboration with colleagues and customers no matter where they are. WebMeeting is fully integrated into your web client, so you can create and access meetings, collaborate, share your screen and more straight from your browser.
How to Schedule a Video Conference
Creating a new video conference is simple and takes just seconds in the 3CX Web Client. The conference feature works with Google, Microsoft 365 and Outlook online and desktop, so you can easily add meetings to your calendar and invite participants.
Simply click “Schedule Conference” in the Web Client menu, select your options and fill in the information about the meeting. You can also choose which calendar you would like the meeting to be applied to. Find out more in the “Creating an Audio or Video Conference” guide.
Easily Share Your Meeting Room for Ad Hoc Conferences
Sometimes conference calls and video meetings are more spontaneous, so we’ve made it easy for you to instantly share meeting rooms to get started right away.
Click WebMeeting in the Web Client menu and you’ll be taken to your meeting room. Click the link icon to copy the meeting room link and share it with participants via email or chat.
Joining a Web Conference
When you’re invited to a video conference, you will receive an email invitation with all of the meeting information. To join the conference, all you need to do is click on the meeting link. Ensure that you authorize access to your camera and microphone.
Join meetings from your smartphone with the 3CX WebMeeting apps for iOS and Android. Important: The Android version enables you to only participate via audio and video and not interact in the web meeting.
Collaborate with Advanced Features
3CX WebMeeting offers a number of features including the ability to toggle audio and video on/off and record the meeting. There are additional advanced features to enhance your meetings and make the experience more collaborative.
- Screen sharing – Share your whole screen or a single window, browser tab, or application.
- Share PDF – Upload, preview and share PDFs. All uploads are saved automatically in the “Shared Documents Repository”. Simply double click a document to share it; participants can then interact with the document using the toolbox at the bottom of the screen.
- Whiteboard – Ideal for brainstorming or online classrooms; collaborate in real-time with the drawing and text tools.
- Start a poll – Want to gather opinions and feedback quickly and efficiently? Create a poll for your participants.
- Share files – Organizers and presenters can share files up to 64MB each by clicking on the file share icon or dragging the file into the chat panel. All participants can open and save shared files.
- React – Offer feedback with reactions by clicking on the hand icon.
Assist and Be Assisted with Remote Control
The remote control feature for Windows PCs allows meeting organizers to remotely control any attendee’s PC. This is a great feature for when a colleague or customer needs help or support with an issue.
To remotely control a participants PC:
- Click on the attendee’s name and select “Remote Control”. If you haven’t already installed the 3CX Remote Control Client, do so when prompted.
- You can open the remote session dialog, select another screen, or end the session by clicking on the blue “Remote Control” icon.
To have your PC remotely controlled:
- Accept the remote control request, download and install the client when prompted.
- End the session by clicking on the blue “Remote Control” icon.
Your Personalized Click2Meet URL
Click2Meet is a unique URL that you can share with customers, partners or colleagues, just like your office phone number, for an easy and free way to contact you. Your shareable Click2Meet URL can be found in your Welcome Email.
When someone requests a WebMeeting via your unique URL, you will be notified by email or chat. All you need to do is click on the URL sent to you to accept the request and enter the meeting.
Note: Your administrator must set the “Notify me” option for your extension or queue for Click2Meet meeting requests to be delivered.
Moderating WebMeetings
As a conference organizer you can assign rights and roles to participants in order to make meetings more efficient and allow all users to contribute effectively. By clicking on the attendee’s name you can:
- Assign them the role of Organizer, Presenter, or Participant.
- Organizer: has full control of the meeting and can use all the available features including accept, reject or kick out users except for the meeting creator.
- Presenter: can share screen, reply to remote control requests, create polls, and share files and PDFs.
- Participant: can participate, reply to remote control requests and polls, and open shared files.
- Kick a user – Remove users from the meeting. Kicked users can re-join meetings at any time.

Settings
You can easily access the 3CX WebMeeting settings by clicking on the icon on the right sidebar menu. Here you can customize the following options:
- Audio
- Video
- Network
You can also find information about the current meeting and the 3CX WebMeeting Privacy Policy.
Using your Desk Phone with 3CX
For the many people, there’s nothing like the feel and functionality of a physical phone. That’s why 3CX supports a number of IP Phone models. Below is a list of guides that will help you setup a conference, transfer a call, check your voicemail and make a call from your deskphone.
Remember! Using the web client for these functions is much easier, and a wide range of our supported devices seamlessly work with the web client so you can control your deskphone with a few simple clicks. You can make and receive calls, chat with colleagues, organize audio and video conferences, check status, access voicemail and more.
Making Calls from Your IP Phone
Transferring Calls from Your IP Phone
Checking Voicemail from Your IP Phone
From the list bellow, select the make and model of your IP Phone to see how to check your messages using your specific handset.
Checking Voicemail from any IP Phone
To check your voicemail from any phone in your office:
- Pick up the handset and dial “999”.
- Press “#”.
- You will be asked to enter your extension number, type in your extension number.
- You will then be asked for your voicemail PIN number. Type in your voicemail PIN number then press ”#”.
- Follow the voice prompts to check or delete your voicemails.
Checking your Voicemail from Outside Your Office
To check your voicemail from your mobile phone or any external phone when you have no WiFi or 3G connection:
- Pick up your phone and dial the number your administrator provided you with.
- Once connected wait until you hear the prompt “Please enter extension number”, type in your extension number.
- You will be asked for your extension’s PIN number. Type your voicemail PIN number then press ”#”.
- You will be given access to your voicemail. Follow the voice prompts to check, delete or listen to your voicemails.
Creating Conference Calls using your IP Phones built in Function
Select your IP Phone from the list below to see how to create conference calls using the built-in functionality of your specific handset.
Using 3CX to Create a Conference Call with your IP Phone
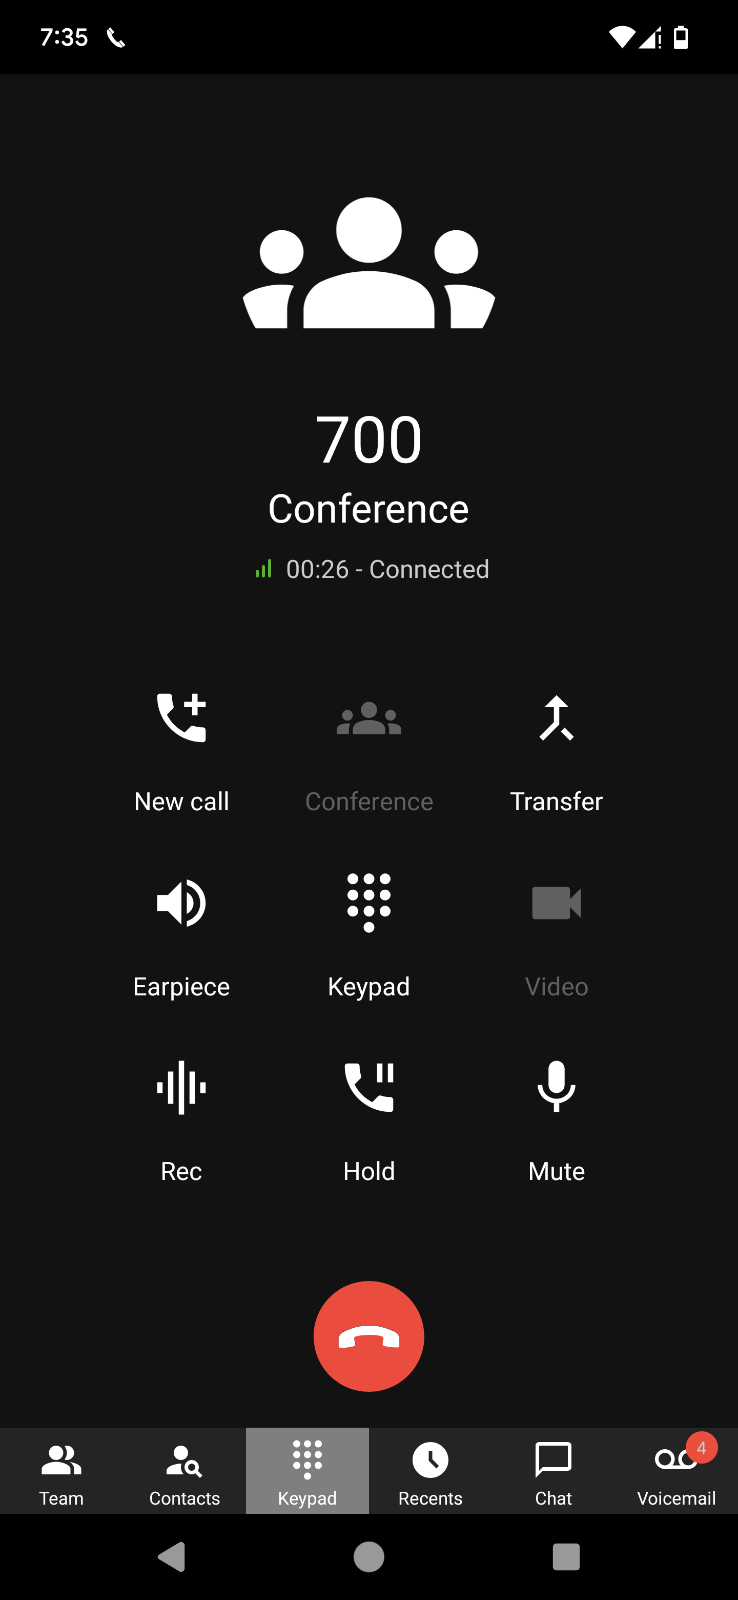
Conference calls allow you to easily setup a call between multiple users – up to 32 callers (licence permitting). Although many conference call services exist, it’s often easier and cheaper to host your own audio conferences. You can set-up Ad-hoc conference calls, without the need to reserve a conference room. This has been done to simplify the set-up of conference calls.
If you wish to setup a call conference directly from your Desk Phone, you will need to inform the other participants of the conference ID and the number they would need to dial. For example, internal callers will need to dial “700” but external participants will need to dial a specific DID or else dial “700” at the digital receptionist (IVR) menu. They will then need to enter the conference ID that you specified for the conference call. The following steps illustrate how to set up a call directly from your Desk Phone:
- Dial the conference extension number, by default “700“.
- You will be requested to enter a conference ID. This can be any number, for example “100” and will be the unique identifier (conference ID) for that specific conference session. Note: If the administrator has configured the phone system to require a security PIN to create a call conference, you must enter it after the conference ID, separated by a *, for example: 100*0000 (where 100 is the conference ID and 0000 the system wide conference PIN). The PIN is only required by the person setting the conference.
- If you are the first participant, the conference interface will ask you to confirm creation of the conference. Press * to confirm or # to cancel.
- You will be asked to speak your name after the beep and press a button to continue.
- All callers who wish to join the conference must first dial “700” to enter the conference menu and then further specify the same conference ID to join a conference or enter a new ID to create a new conference.
- You will now enter the conference. If you are the first caller, you will hear music on hold, while you wait for the other callers. As soon as another caller joins, his name will be announced.
Note: Prior to creating the conference, you should notify all of the participants you require to be present in the conference. This notification should include the conference extension number, conference ID, conference PIN, DID and calendar information.
Creating an Audio or Video Conference
3CX’s video conferencing solution allows for effective, face to face communication and collaboration with colleagues and customers. With 3CX, your invitees can seamlessly join meetings from their browser with absolutely no login, sign up or installations. All they need is your meeting link. They can join in-browser on Chrome or Firefox, or use one of the free video apps for Android or iOS.
Create an ad hoc video conference

Go to “Meet” in the left-hand menu of your Web Client or Web App. By default, the Quick meeting will be ready for you to start a meeting. Test your internet connectivity before your meeting.

- As soon as you are ready hit “Start Now”.
- A pop-up window will appear to “Invite Participants” via email. You can also copy the meeting link, share it via WhatsApp, or scan the QR code to join from your mobile.
- To add more participants during the conference, simply click the “Add Participants”
icon at the left bottom of the screen.
- Participants can join the conference by opening the Meeting link.
Settings
In the bottom right corner you’ll see a gear icon 
- Devices: edit your devices; camera, microphone and speakers which are used for your meetings.
- Meeting Quality: adjust the quality of your meeting
- The toggle bars allow you to blur your background, add HD, enable echo cancellation etc.
- Notifications: choose which actions you want 3CX Meet to notify you of.
Is your internet connection good enough?
Video conferencing requires a reliable and stable connection. To make sure that your audio and video settings are optimized, click on the “Self Test” button in your 3CX Meet window.

This automated test will run for about 2 minutes and will take you through 3 phases. Once the test is completed, you’ll receive one of three results: “Acceptable”, “Good” or “Poor”.
If you receive an "Acceptable" or "Good" result, your audio and video settings are optimized for a good user experience during meetings. If you receive a "Poor" result, you will need to adjust your settings or troubleshoot any issues with your equipment and/or internet.
How to schedule an audio or video conference

To schedule a new conference:
- Go to “Meet” and press the “+” sign.
- You can choose between audio conference, video conference or webinar.
- If you are scheduling a video conference or a webinar, press on the gear sign. A pop-up with additional meeting options will open.
- Fill in the conference details.
- From the drop-down “Select email / calendar to add to”, you can choose between Google, Microsoft 365, Outlook Online or Desktop Outlook (.ics).
- Click “Create Meeting”.
- Your calendar will automatically open in a new tab with a ‘New Event’ pre-populated with all the details. If you are using desktop Outlook, an .ics file will download. Open the file and a pre-filled calendar entry will open on your desktop.
- Invite your participants, make any additional changes and click “Save” or “Send”.
- To join a meeting you can click on the link in your calendar.
- To delete a scheduled conference, go to “Meet” and press the Scheduled Conferences
button and then
.
Note: selecting “Email (Legacy, NO RSVP)” will send a bare bones email invitation in which the RSVP function does not work. We highly recommend you choose one of the other options - Google, Microsoft 365, Outlook Online or Desktop.
Your personalized 3CX Meet URL
The 3CX Meet link is a unique URL that you can share with customers, partners or colleagues, and they can contact you for free, just like your office phone number. Your shareable Meet URL can be found in your “Welcome to 3CX | Your Account Details” email or under “Settings” > “3CX Talk” in your Web Client.
A simple click on your 3CX Meet or Talk link and you’ll be connected. You will then receive a request to join the call or meeting.
Managing a Video Conference

The 3CX Video Conference platform offers a range of features that can be used to enhance virtual meetings. These features vary from the very basic - such as “Add participants”, “Mute/Unmute Audio”, “Turn Camera On/Off”, “Chat”, and “Raise your hand” - to some more advanced features such as “Present your screen”, “Share Content” and “Start Recording”.
Users can also choose between the “Tile View” and “Full Screen” for their screen “Layout” as well as manage devices, meeting quality, and view statistics with the “Options” feature.
For more information on advanced features such as collaboration tools, remote control, meeting moderation and settings, visit our Advanced Video Conferencing guide.
Moderate and Control Users
An organizer can perform actions and provide additional rights to participants depending on their role, by clicking on a participant’s name and selecting:

- Spotlight - Enlarges the participants' window so that they can present or speak.
- Turn Camera On/Off - Requests permission to enable the participant's camera.
- Mute Audio - Enables and disables the participants' microphones.
- Co-host - Has full control of the web meeting and can use all the available features, as well as use the Remote Control function, control cameras, microphone and chat access. Co-hosts can also accept, reject or kick a user out of a meeting.
- Presenter - Can share their screen, reply to remote control requests, polling and share files and PDF documents.
- Participant - Can reply to remote control requests and polls, chat and open shared files.
- Kick - Immediately remove a user from a meeting. ‘Kicked’ users can re-join a meeting.
Note: The meeting creator’s role is denoted by the title of “Host” and cannot be moderated by other organizers.
Video Conferencing for Advanced Users
3CX includes some truly collaborative features in the 3CX Meet function. Our advanced web conferencing features are ideal for webinars, online presentations, screen-sharing and more. This guide will take you through 3CX’s advanced web conferencing features and how to use them. To learn how to create an ad hoc web meeting or a simple video conference, read our video conferencing guide.
Collaboration Tools
Whiteboard
An online whiteboard is the virtual form of the traditional classroom blackboard - a virtual canvas. It helps visualize ideas and brainstorm without the need to physically be in the office. 3CX Video Conferencing has 3 templates to choose from.

During a meeting, click the “Share Content” button (shown above) in the bottom right corner.
- You will be given the choice to choose either a blank, dotted, or Chalk Board template.
- Once you choose your template, a toolbar will appear at the bottom of your screen with various options: text, draw, fill and so on.
- To stop sharing the whiteboard press the “Stop Sharing Content”
button.
Share PDF
Click the “Share Content” button and then press the in the bottom right corner to upload and share PDFs while in a meeting:
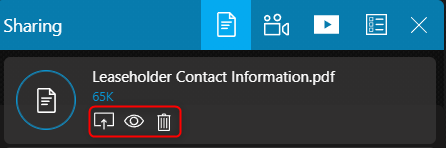
- Once you upload a PDF it will be shown in your 3CX Screen Sharing options.
- From there you can choose to share them with other meeting participants, view them in a separate tab or delete them.
- Click the share
button to share the PDF with the participants.
- Once shared, a toolbar will appear at the bottom of your screen with various options: text, draw, fill and so on.
- The participants can ask questions related to the document by clicking the
“Raise your hand” button.
- To stop sharing the document, press the “Stop Sharing Content” button.
Screen Sharing
The “Screen Sharing” feature is used as a collaboration and presentation tool allowing you to present your screen to other participants.

- Click on the “Present your screen” button in the bottom menu.
- Choose whether you want to share a “Chrome Tab”, a “Window”or your “Entire Screen”.
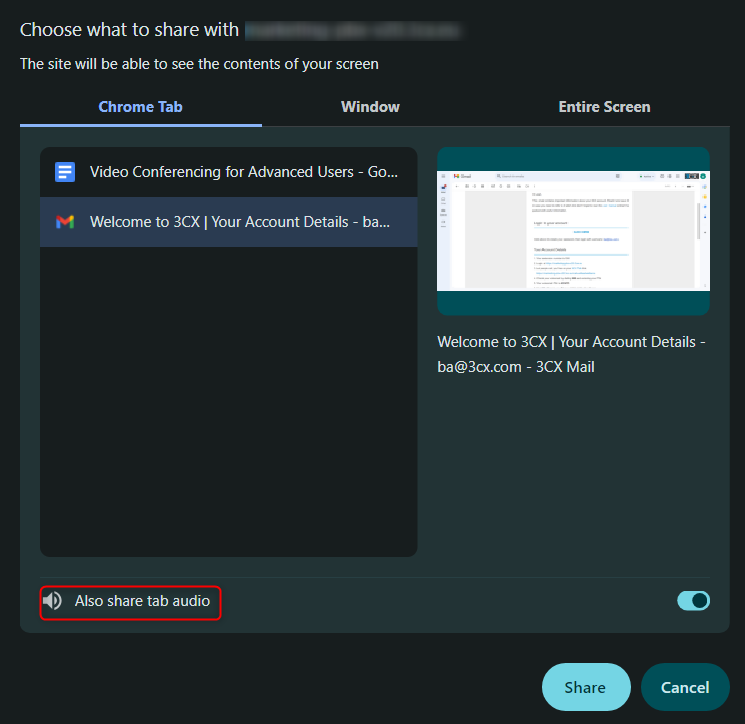
- If you choose to share a Chrome Tab you will have the option to “Also share tab audio”. Click the toggle bar accordingly.
- Press “Share”.
- To stop screen sharing, click on the “Stop presenting” button.
Chat Features
The chat feature is accessible from the bottom right corner .
Share Files

- Organizers and presenters can share files up to 32MB size each, by:
- Drag-and-drop in the chat panel.
- Clicking the “File upload” icon and selecting the file(s) to share.
- All participants can open and save shared files.
Chat Q&A
From the chat panel, you can create polls and participate in a Q&A by clicking the “Questions” button.
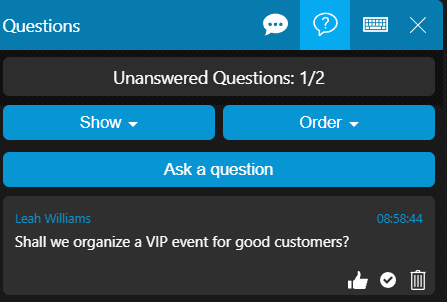
- From the “Show” dropdown you can see your “Answered”, “Unanswered” and “All” questions.
- The “Order” dropdown allows you to sort questions by “Oldest”, “Newest” and “Popular”.
- Add your own questions by clicking the “Ask a Question” button.
- Block participants from asking a question by clicking the “Disable and lock the questions of the audience”
button in the chat bar.
Get Feedback
Create Polls

Organizers can actively engage with their audience and get their feedback by creating polls.
- Click on the “Share Content” button to bring up the Presentation options.
- Select to “Start a new poll”
. Here you will see a list of previously created polls and the options to share, edit or delete them.
- Create a new poll by clicking on the
in the bottom right corner.
- Now add the questions and their answer choices.
- Click on “Save” to store the new poll.
- Your poll will now be saved in your poll repository.

- Create report - creates a pdf report of the poll in a new tab. Participants are able to download a PDF file with the poll results from the “Open Report” button.
- Share results - share poll results with participants. By default participants’ names and their answers are shared.
- Anonymous - allows the organizer to create an anonymous poll report. The answers are included, however, the names of the participants are not.
- To remove the poll from the participants’ screens and resume the meeting press the “Stop Sharing Content”
button at the bottom.
Broadcast on YouTube
Go live on YouTube and broadcast your web meeting to your customers and followers.
- Login to YouTube and from the top right click on “Create” > “Go Live”.
- Click on “Schedule Stream”.
- Enter your Live Stream Details: Title, Description, Age restrictions and so on.
- Choose your customization settings, i.e. who can send messages and reactions.
- Choose your Live Stream visibility, public, private or unlisted and then schedule your live stream.
- Click “Done”.
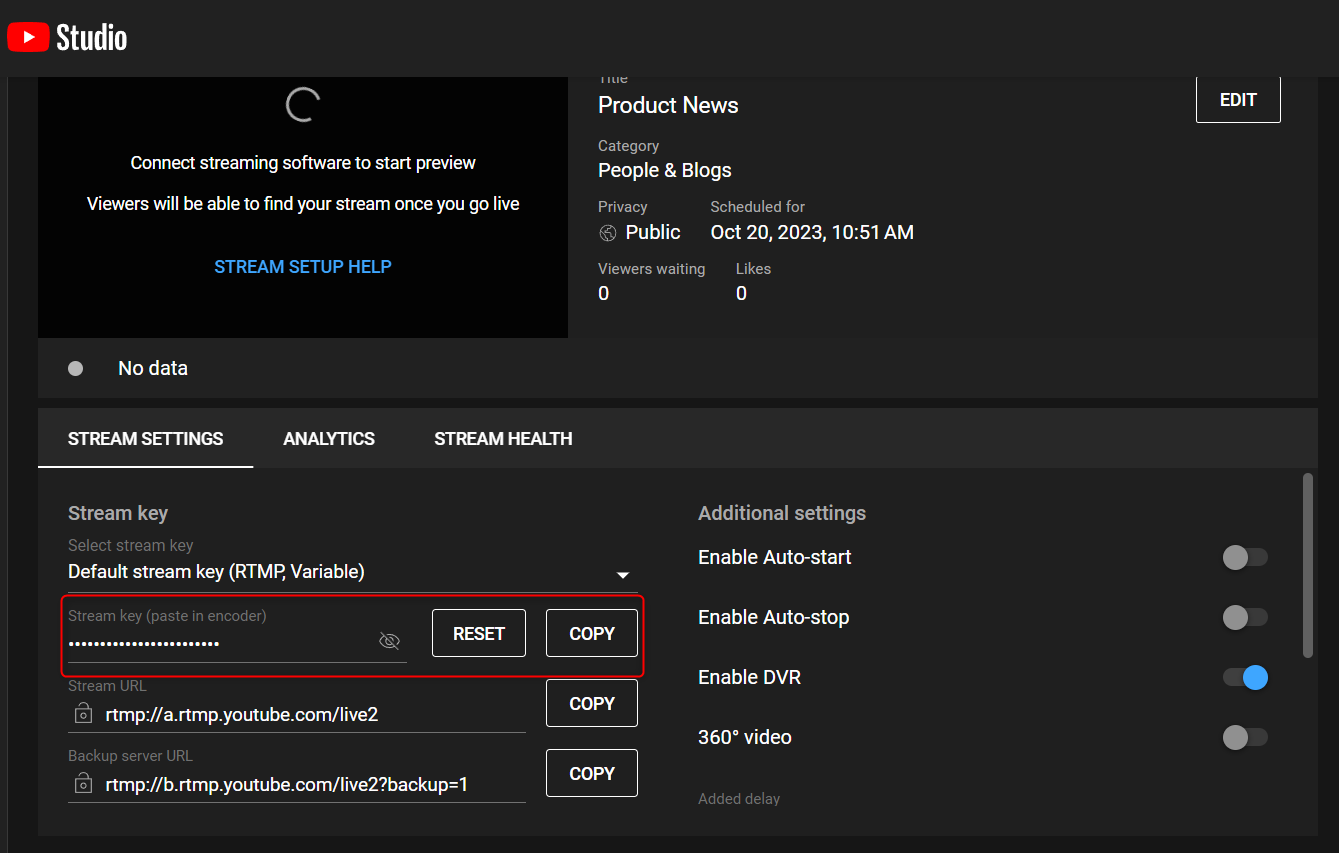
- From this screen you need to copy the stream key - as shown above.
- Go to 3CX Meet and click on the “Share Content” button.

- Select “Share video stream”, shown above. Enter the YouTube Stream Key you copied from YouTube.
- Click on the
button and the “Ready” status will change to “On Air”.
- Go back to YouTube and click on the “Go Live” button in the top right corner.

- You are now Live Streaming!
- To pause your stream click on the coffee cup icon in 3CX
. This mutes and disables all participants' audio/video devices and a banner will be shown on Youtube until you are ready to resume.
- To end your live stream click on the “End Stream” button in the top right corner in YouTube. Alternatively, streaming will automatically stop once you end the meeting in 3CX.
Notes:
- To start your first live stream you may need to verify your channel. Go to “Create” > “Go Live” and follow the prompts on YouTube to do so. Enabling your first live stream may take up to 24 hours. More information here.
- Depending on your location there may be a 20 second delay for video transmission.
- Chats of participants on YouTube cannot be seen or answered in 3CX.
In meeting video playback with YouTube
Existing YouTube content can be played during a video conference. The presenter remains in control of video controls such as play/pause and timeline skipping.
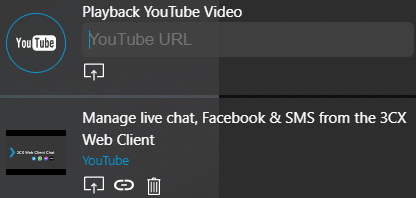
- Open Youtube and copy the video URL from the share icon.
- Go to 3CX Meet. Navigate to “Share Content” > “Share Video Stream”.
- In the “Playback YouTube Video” field, enter the copied URL and press “Share”.
Note:
- Videos need to be publicly available as every participant will load the video directly.
- YouTube Ads cannot be removed.
- All uploaded YouTube videos are accessible to the host throughout the meeting and can be presented, shared or deleted at any time.
Meeting Rooms
3CX supports two types of virtual meeting rooms, as set by your system administrator:
- Private - For one-on-one meetings, ideal for support and customer service inquiries. Your extension’s 3CX Meet URL can be used as a Private room, enabling anyone to join from their browser. The system sends a notification e-mail or chat to the assigned extension when the link is clicked and a meeting is requested.
- Shared - If the option “Requires you to connect to the meeting first” is enabled by your PBX Administrator, you can organize group meetings. Participants can join the meeting via the 3CX Meet link:
- Directly if the organizer has already joined.
- After the organizer’s approval if the “Approve Participants” option is set by the PBX administrator for your extension to moderate participants.
Notes:
- If the “Approve Participants” option is set, kicking a participant out of a meeting allows the organizer to stop them from rejoining.
- You can “Lock the Meeting” to prevent participants logging in once the meeting has started.
Settings
To edit your settings, click on the “Options” button (the gear icon) on the bottom right of your 3CX Meet screen.
- Device:
- Webcam
- Microphone
- Speakers
- Meeting Quality:
- Choose between “Stability”, “Balanced” and “Quality” to automatically adjust the video, for a more stable meeting experience.
- Background Blurring.
- Full HD resolution in Quality Mode (High CPU usage).
- Auto Gain Control - increases or decreases your mic’s input and output automatically.
- Echo cancellation - removes echo caused by the mic picking up the speaker's output.
- Noise suppression - filters out very specific noises like keyboard typing.
- Notifications:
- Enable or disable the sounds on join and chat.
- Force sound on join, even if the web client is in foreground.
- Force sound on chat, even if the web client is in foreground.

- Switch to the “Statistics” tab as shown above to see:
- Connection data.
- Technical info in regards to uplink stats,video loss, resolution, platform info and system connections.
- The “Statistics” section includes helpful graphs for troubleshooting connectivity issues.
What is an online whiteboard?
A progression from the traditional blackboard, whiteboards are a common tool in all classrooms and many a conference room. While on-site meetings and classrooms do just fine with the old-style dry wipe physical whiteboard, virtual whiteboards are becoming increasingly common in order to facilitate online meetings and tutorials.
An online whiteboard is a web-based collaboration tool. As more and more businesses opt for remote working, and business opportunities spread far and wide, many of us are opting for online meetings. These web whiteboard tools allow for the same level of collaboration and contribution from all participants, no matter where they are.
Digital whiteboards can be used for a variety of purposes such as brainstorming and visual depictions of data and ideas in the form of graphs, text and illustrations. What's more, modern online whiteboards can be easily accessed by anyone through their web browser.

Interactive & collaborative business meetings
Businesses using video conferencing as a means of conducting meetings can benefit from additional tools that allow participants to work together more effectively. A whiteboard app can take any team meeting to the next level, allowing for productive brainstorming sessions and a more effective method of communicating ideas with colleagues. Some virtual whiteboard apps also offer screen share mode, so that you can easily assist customers and colleagues who need it.
Online tutoring & lessons
Students in distance education can more easily connect with online tutors for a more authentic experience (even without a real whiteboard!) Topics and areas of struggle can be explained visually so that classes are more effective. What's more, students' whiteboards enable participation of everyone in the class, for a more realistic and collaborative learning environment.

What are the benefits of web whiteboards?
Online whiteboards can bring forth numerous benefits but most importantly, it allows employees, students and teachers to join, interact and collaborate from wherever they are.
Use the 3CX whiteboard feature to boost collaboration in meetings
3CX's integrated audio and video conference solution includes special features to take your meetings and online classrooms to the next level. Start a live presentation for all connected participants with 3CX WebMeeting and guide them through your online whiteboard. All your participants will see the same parts of the whiteboard as you do, making it the perfect supplement to your live audio and video conferences.
Save big
3CX WebMeeting allows your business to carry out online meetings with all your customers wherever they are and still benefit from a productive, face-to-face discussion while saving precious time and travel expenses. For remote workers, 3CX's video conferencing feature and it's collaborative features enables participants to achieve a level of synchronicity with other team members. Businesses can reduce travel costs, save time, and cut costs on overheads by utilizing remote working.
The 3CX Android App: Work Remotely
The 3CX smartphone app for Android allows you to seamlessly take your office communications with you wherever you go. Access the company phonebook, make calls, answer incoming customer messages and more from the palm of your hand. There’s no need to use your personal mobile plan for business calls anymore.
Setting up your Extension
If you haven’t already, install the app from the Google Play Store.
- Agree to the license agreement.
- Allow 3CX to access the camera so you can provision your extension via QR code.
- Scan the QR from your web client, desktop app or PWA.
- Grant all the necessary permissions in the Permissions screen and you’re all set.
Placing a Call with the 3CX Android App
Making a call with the Android app is quick and easy. In “Contacts” search by name, number or email address, click the phone icon next to the contact and hey presto! You’re now using your office phone system from your smartphone.
Once you’re in a call, you can seamlessly perform a number of actions, including:
- “Transfer” will give you the option to “Blind” without the need for you to speak to the receiver, or “Attended” will transfer the call after you first speak to the receiver to see if they accept the call and press “Join”.
- “Conference” allows you to create an ad hoc conference call, adding more participants to join the conversation.
- “Rec” allows you to record your conversation.
- “Video” adds video to your call for face to face communication.
Use Google Assistant to Make Calls
Ask Google to make a call using 3CX, be it by name e.g. “OK Google, call James using 3CX” or by number e.g. “OK Google, call 101 using 3CX”. When calling by name, the Google Assistant will try to find a person in your device’s contacts, to pass on to the 3CX App.
- If only one contact is found to have one number, the call is initiated immediately.
- If the contact has multiple numbers, the 3CX App will open the contact card for you to choose the number to call.
- In the case of several people with the same name, the 3CX App will filter all contacts by name for you to choose the correct contact.
To set up:
- Enable Google Assistant on your device.
- Ensure both the device and Google assistant region are set to “English (US)”.
- Install the 3CX App with an active account.
How to Schedule a Video or Call Conference
Create a video or call conference in seconds with the Android App:
- Tap on the menu
button in the top left corner and select “Schedule”.
- Add your Subject then choose a date and time to schedule your conference.
- If you are creating an audio conference you will see a “PIN”
- If you are creating a video conference then you have to enable the “Video” option.
- Choose whether you want to create a calendar event and proceed to “Add 3CX Contacts”.
- Tap “Next” and a new calendar entry or a pop up to share the meeting will open.
- Tap “Done”.
Note:
- Once the conference is created you cannot alter the participants.
- You can share it via the available apps provided on the screen such as Viber, WhatsApp, Bluetooth and more.
- To join a video conferencing from your Android smartphone you will need to have the 3CX Video Conference App installed.
Create an Ad-hoc Conference
You can effortlessly add participants from the onscreen options during an ongoing call.
To elevate a call to an audio conference simply:
- Click the “Conference” button on the dialpad.
- Search for who you want to add to the call by name or extension, or enter their phone number.
- Tap to call. They will be automatically dialed and added to your call.
See our Video Conferencing chapter on how to create a video conference from your smartphone.
Set your Status and Avoid Distractions

Using the Status feature will let your colleagues know if it’s OK to call you, saving you from being distracted and them from wasting time.
Choose from Available, Away, Do Not Disturb, Lunch, Business Trip, and Set Status Temporarily.
You can further customize your status and call forwarding rules by entering the status profile menu.
Customize your 3CX App

Personalize your app experience to suit your preferences in the Advanced Settings, which offer a number of options including Car/Bluetooth Support, Silence Detection, Battery Optimization and Ringtone customization.
To access Settings, simply press the menu icon at the top. From here you can also:
- Add, edit and switch between accounts
- Choose your theme
- Configure audio options
- Request a new Welcome Email.
Having problems receiving calls?
You could be experiencing issues with PUSH notifications. Follow the 3CX Android PUSH Troubleshooting guide for help on how to fix this.
The 3CX iOS (APPLE) App: Work Remotely
Your office anywhere
Whether you choose to work remotely from home, by the pool or at your neighborhood cafe; the 3CX iOS app lets you take your office extension along for the ride! Apart from call and contact management, you can also chat with colleagues and customers via WhatsApp, Facebook, SMS and website live chat as well as hold a video conference - all from the palm of your hand.
Step 1: Install the iOS app
- Install the iOS app from the App store.
- Open the app, read and accept the license agreement and authorize the permissions the app needs (camera, microphone).

Step 2: Configure your Extension: Scan the QR code

- Open your web client or desktop app and click on the QR code in the top right corner.
- Open your camera on your iOS device and scan the QR code shown on your screen.
- Your extension is configured and you’re now “Ready for calls”!
Making a call
Using the iOS app to make a call is as straightforward as making a call from your smartphone’s native call function.
- Enter a number via the dialpad and press call.
- Tap on the
option from the menu and search contacts by name, extension number or email address. Or tap on a contact and select “Call”.
You can easily perform a number of actions on an active call:
- “Transfer” allows you to perform two types of transfers.
- “Blind Transfer”- transfer the call directly without addressing the receiver.
- “Att. Transfer”- first speak to the receiver and then transfer the call.
- “Conference” - add more participants to the call.
- “Record” - record the conversation.
- “Video” - take your call up a notch by turning it into a video call.
- “New call” - places the current call on hold to make a new one.
Ask Siri to make a call
Use Siri to make a call using 3CX, be it by name e.g. “Siri call James using 3CX” or by number e.g. “Siri call 101 using 3CX”:
- Ensure your device has Siri enabled. If not, go to “Settings” > “Accessibility” > “Siri”.
- On your first request, Siri will ask permission to access 3CX data – tap “Yes”.
- Siri will launch the 3CX app and make the call.
- Launch the 3CX app at any time by saying: “Siri, open 3CX”.
- In the case of several people with the same name, Siri will prompt you to choose which number you want to call.
Speed dial Widget
Quickly make calls using the 3CX Speed dial widget from your iOS screen.
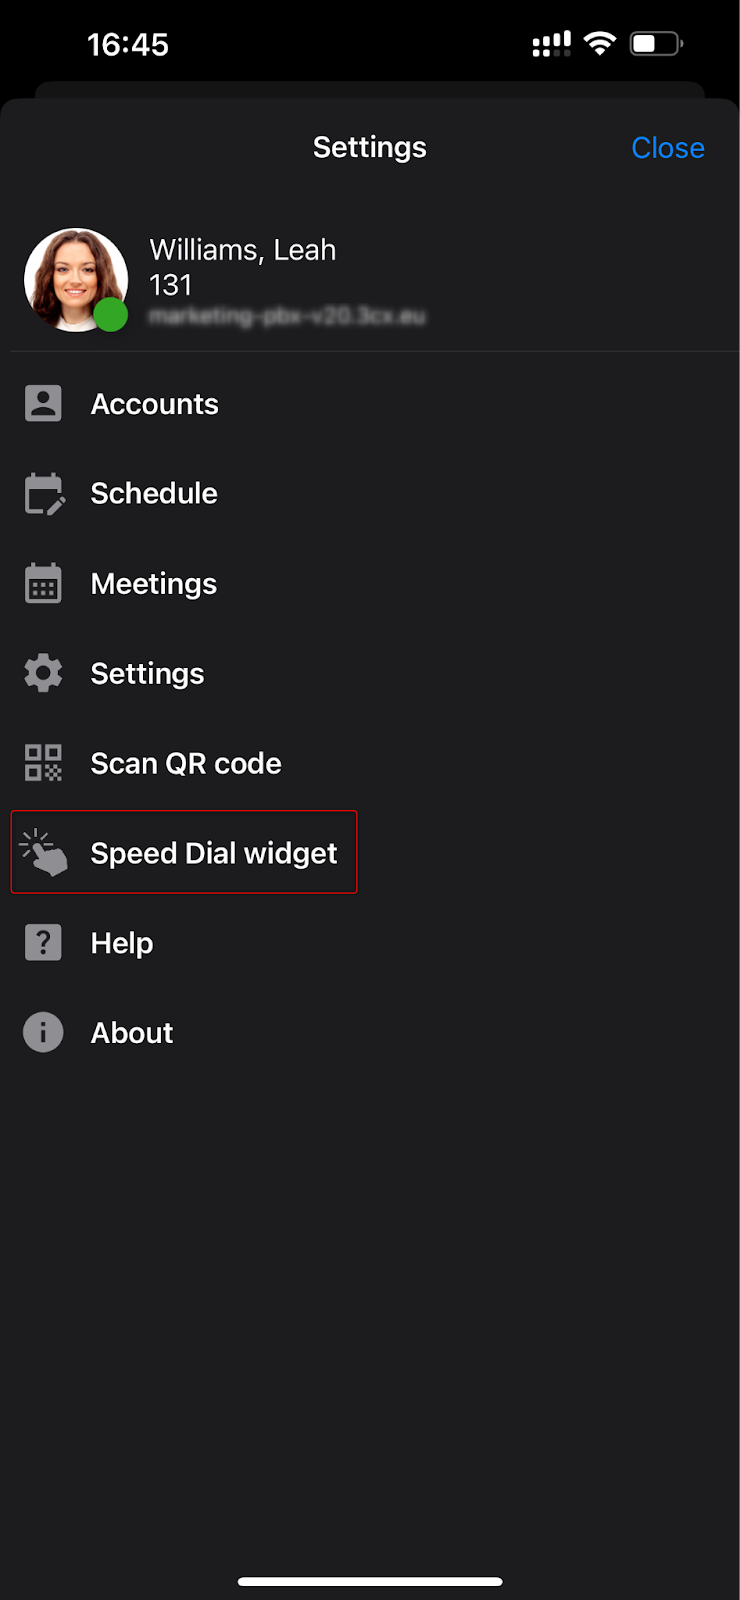
- Tap on the
menu in the top left corner.
- Select the “Speed Dial widget”.
- Choose 1 of the 3 view options:
- Buddies: Add up to 20 contacts and quick access to “Missed calls” and “Messages”.
- Cards: Add up to 10 contacts in a 2-column list.
- List: A list of the 5 most used contacts.
- Add your extensions by tapping on the empty slots and selecting the contacts you want to include.
- Once done, press the “Settings” to go back.
- Go to your iPhones home screen and long-hold anywhere on the screen until your apps start “shaking”. Press on the “+” option in the top left corner.
- In the search bar, search for “3CX”.
- Tap on “Add Widget”.

- The widget will now appear on the top of your home screen.
Schedule a video / audio conference
With the iOS app, it's quick and easy to create an audio or video conference and invite participants. To schedule an audio conference call:
- Tap on the menu
- Add the subject and set the date and time of your conference. To create a video conference enable the “Video” option.
- The “Add to Calendar” option will create an event in your device’s calendar. If you don’t want to add the conference to your device’s calendar, disable this option.
- Tap “Save”.
- A new screen will appear called “New Event”.
- Tap on the “Invitees” option to add participants.
- Tap “Done” when all participants are added. Once the conference is created you cannot alter the participants.
- Tap on the “New Event” option in the top left corner.
- Adjust your conference settings from here such as alert, repeat, attachments and any notes.
- Click “Add” in the top right corner when you’re finished.
- Your conference is now scheduled and your Invitees will receive an email with details.
- View all your scheduled conferences from the
To join a video conference from your iOS device the 3CX Video Conference App must be installed.
Create an ad-hoc conference
Add participants to an ongoing call to create an ad-hoc conference.
- During a call tap on the
option on the dialpad.
- Search for who you want to add to the call by name or extension, or enter their phone number.
- Tap the contact or “Call (Number)” of the person you want to add. If only one number is assigned to the contact, this number will automatically be dialed and added to your call.
Elevate a call to a video
- During an audio call you are able to easily switch to video by simply clicking on the video icon
.
- The person on the other side will receive a notification that you are requesting video and can choose if they also want to share their video with you.
- It is not possible to elevate an audio conference to a video conference.
Share your availability with Status
The status feature is a great way to inform your colleagues whether they can call you. This enables you to create a distraction free zone and it also helps your colleagues handle calls more efficiently.
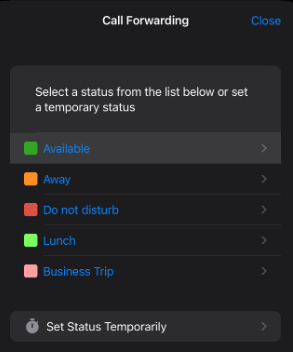
- You can find your status options by tapping on the green box in the top right corner.
- Choose from Available, Away, Do Not Disturb, Lunch, Business Trip and Set Status Temporarily.
- Customize your status and configure forwarding rules by pressing on the arrow next to the status.
iOS app menu
From the menu you can:
- Switch between accounts or add a new extension.
- Schedule conferences and view upcoming meetings.
- Access your “Settings” from where you can:
- Edit your notification sounds
- Divert emergency numbers to GSM
- Manage device integrations
- Re-provision
- Request for account credentials to be resent
- Troubleshoot
- Scan your QR code from the web client.
- Access the speed dial widget.
- Get help
Managing 3CX Calls in iPhone Recents
This setting uses Apple CallKit integration. Turning it off removes the integration with the native iOS call history. Older entries may still remain in "Recents" until manually cleared.
- Open the 3CX app on iPhone
- Tap the menu icon (top-left)
- Go to Settings
- Find “Integrate with Device Recents”
- Toggle it:
- ON = 3CX calls appear in the native iPhone Phone app Recents/call history
- OFF = 3CX calls stay only inside the 3CX app history and no longer appear in the iPhone Phone app Recents list
Auto Attendant / IVR / Office Hours - Call Routing
You probably don't want calls to ring your mobile in the middle of the night. Thank God for the office hours function then. Here you can configure when your business is open and when you are on break and then route your calls differently when your office is closed. To make all this work you need to not only configure your office hours but you must also ensure the calls are routed to this inbuilt “office hours” IVR menu.

Step 1: Configure Office hours
To configure your office hours:
- From the 3CX Web Client go the “Admin” section and then to “Office hours”:
- 3CX FREE/SMB - Your office hours will apply to the whole team.
- Dedicated - You will see an extra column listing the groups you have created, with at least one group call “Default”. The office hours will be applied to the members of that group only.
- Click on the days and specify your opening hours.
- Add any breaks you might take.
- Use the “Add” and “Clear” button for each section to add or remove times for every day of the week in one single bulk action.
- If this group is in a different time zone, you can set the time zone at the bottom of the page.
- If you have multiple groups then repeat this process for each group.
Step 2: Assign a DID and route calls
After you have configured your office hours you have to route all your calls to an assigned number and then select what the system should do based on the time the call is received:
- In the “Assigned DID numbers” section, select a DID that has not been assigned. If you have just one number, then select this number.
- Now select a destination for calls received during office hours, out of office hours and break:
- Another “User”
- Someone’s “Voicemail box”
- “Ring Group”
- “Digital receptionist”
- “Queue”.
Step 3: Record an announcement
How about welcoming callers while they wait for you to take a call? Pretty cool right? To configure this:
- Toggle the “Play announcement” slider on.
- Record what you want to tell your callers. Something original like ‘Thank you for calling Company XYZ’. To record your greeting:
- Click the “Record” button.
- Enter your desired file name and click the “Record” button.
- The popup will show your recording time. When finished, click the “Stop” button.
- You can now listen to your greeting, re-record it or click the upload button to save.
- Your recording will now be shown in the drop-down box.
- If you already have an audio file, you can upload your announcement as a Mono, 8khz, 16bit WAV file. If you have a music file that does not fit the required audio format, you can use our audio convertor tool.
- Repeat this with a different announcement for when you are on break or when your office is closed.
If you do not see the “Record” button, ensure your microphone is properly configured and allowed in “Settings > Audio/Video”.
Step 4: Configure Holidays
Do you go on holiday? OK, then you can configure these days here and have your calls handled as if your office is closed. Just click on the “Add” button below “Set your Holidays” and specify date and time.
Step 5: Overriding open, closed or break mode
Got into work early and want to open the office? You can override the open office hours from the account menu in the Web Client. Of course you can do the same thing to close the office early.

- Click on your avatar. You need to have either the “Receptionist” or “Manager” role on 3CX.
- Select “Override office hours”.
- Use the drop-down to select one of the pre-set statuses or create a “Custom” one, and choose the duration.
- One of the options is to play a prompt and end the call: “Play announcement and end call”. This can be useful in case of emergency or training.
- Click “OK”.
- Now it will show until when the override is in effect. After the time elapses the default office hours will come into effect again.
Step 6: Advanced Digital Receptionist
Outgrown the basic IVR menu? Then you can create advanced digital receptionists with many more options! You will need to do this if you want to allow the caller to choose from a list of options, for example sales or support.

To create a digital receptionist:
- Go to “Admin > Call handling”
- Click “+ Add digital receptionist”
- Give your new digital receptionist a name like “Public Holiday”
- If you want to assign a DID to this IVR so calls go directly to this IVR, you can do so under “Assigned valid DID number(s)”. If you do this, then the calls will skip the office hours function and all calls will ALWAYS be routed to this DID.
- Upload or record your greeting. Something along the lines of “Thank you for calling XYZ, press 1 for sales and 2 for support”. Some tips:
- Do not use reserved characters (< > : " / \ | ? * &) in the prompt filename.
- If you are going to pre-record your announcement, do so in the format PCM, 8 kHz, 16 bit, Mono. In Windows Sound Recorder you must use the “Save As” option to save to this format. Do not use MP3 format. You can use our audio convertor tool.
- Announce the number the user needs to press after the option, i.e. ‘For sales, press 1’.
- Select the desired destination for each digit.
- In the options tab you can select a number of options such as a different prompt language or alternative route for SMS messages sent to this number.
- Click “Save”.

Call Queues & Ring Groups

3CX allows you to create call queues or ring groups to handle incoming calls as a team:
- “Ring Groups” route calls concurrently to multiple phones via virtual extensions.
- “Call Queues” allow calls to be queued so that agents can take calls when they are available. If all agents are busy, calls are kept waiting until an agent is available. The Call Queue feature is only available in 3CX SMB and dedicated instances running PRO and Enterprise editions.
Ring Groups
3CX FREE includes a default ring group that includes all your team members. Calls will be forwarded to this ring group and it will ring the team members one after the other. That way, if one is unavailable, another team member can answer. You can change this behavior and exclude team members from the ring group. In the 3CX SMB, PRO and Enterprise editions, you can create your own ring groups.
To edit your ring group or create a new ring group:

- Go to “Admin > Call handling”.
- Click on your existing ring group or click “+ Add ring group” to create a new group.
- If you are creating a new group, type a name. Something like ‘Sales Team’.
- Use the drop-down box to assign a DID number that will route directly to your ring group.
- Specify what should happen if no one answers the call. Default ringing timeout is 60 seconds.
- Edit the ring strategy
- Ring all – Does what it says. Rings all group members at the same time until someone picks up or the 60-second timeout is reached.
- Prioritized hunt – Means it will start with the top group member and proceed down the list. That means that the first ring group member will receive each and every call!
Call Queues
Queues go way beyond ring groups and are much cooler. A queue will take the call and put the caller in the queue if you cannot take the call immediately. To configure a queue:
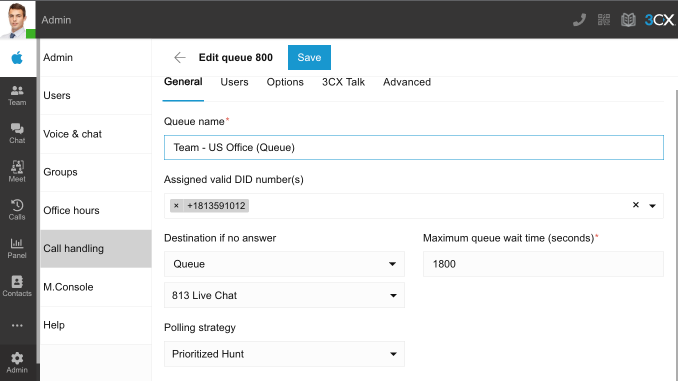
- Go to “Admin > Call handling”.
- Click “+ Add queue” at the top of the screen.
- Under the “General” tab:
- Give your queue a name.
- Select a DID to be assigned to this queue. That routes calls to this number to this queue.
- Specify what should happen if no one answers the call. By default, the call will be ended.
- Choose your maximum queue wait time. That’s the length of time a caller will be held in the queue before their call follows the “Destination if no answer” route.
- Select the polling strategy:
- Prioritized Hunt – Distribute calls according to the order specified in the ‘Users’ section. i.e. all calls go to the first user, and only if this user is busy, the calls go to the next user. This strategy can be used to set up skills-based routing, by prioritizing the agents according to their skills.
- Ring All – ring the phones of ALL the agents.
- Hunt Random Start – Randomly choose an agent to distribute the call to and evenly distribute calls among available agents.
- Round Robin – Sequentially cycle through agents logged in the queue, i.e. the first call is sent to agent 1, the second call to agent 2, and so on.
- Longest Waiting – Forwards the call to the user waiting for the longest.
- Least Talk Time – Forwards the call to the user with the least total talk time.
- Fewest Answered – Forwards the call to the user who answered the least number of calls.
- Hunt by Threes Random – Sends the call simultaneously to 3 random users.
- Hunt by Threes Prioritized – Forwards the call simultaneously to 3 users at a time as prioritized in the “Users” section.
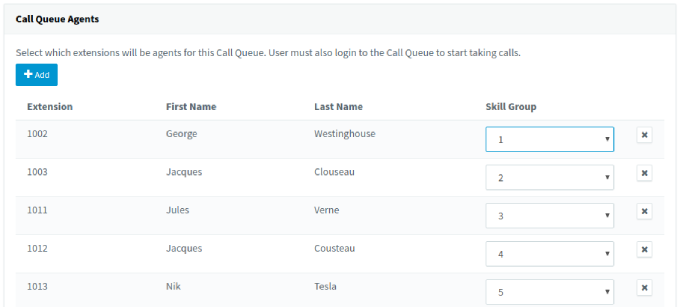
- Now you need to assign “Users” to answer the calls. Go to the “Users” tab. Use the “+ Add user” button to choose which team members will be part of the queue. Watch out for the order of users as some of the polling strategies work from the top of the list to the bottom.
- Go to the “Options” tab:
- You can choose a different music on hold. Ensure the file is in WAV format. You can use our audio converter tool.
- You can upload a greeting or record your own. To record your own greeting with something like ‘Thank you for calling Company XYZ’:
- Click the “Record” button.
- Enter your desired file name and click the “Record” button.
- The popup will show your recording time. When finished, click the “Stop” button.
- You can now listen to your greeting, re-record it or click the upload button to save.
- Your recording will now be shown in the drop-down box. If you do not see the “Record” button, ensure your microphone is properly configured and allowed in “Settings > Audio/Video”.
- “3CX Talk” lets you name the ‘3CX Talk link’ for the queue, and lets you choose the information you want customers to provide prior to the call being initiated. Once configured, copy the URL and use it in email signatures, websites, or digital business cards.
- Click “Save” at the top of the page.
Important: Queue members must be logged in a call queue to start answering calls. You can configure queue member extensions to automatically log in and out by enabling their “Forwarding Rules > Statuses > Options > Log out from queues” option for each status profile via the Management Console, or disable users logging out manually.
Advanced Options
3CX features a number of advanced customization options located under the “Advanced” tab:
- “Allow call back” – the customer can choose to be called back instead of waiting in the queue. This option can be triggered either by:
- “Triggered on user request (Press 2)” – the call back will be requested by the caller by pressing “2”
- “Offered to caller after” – the caller will be offered to called back after the queue time specified expires
- “Record Calls” can be enabled and callers can be offered the chance to opt-out by pressing the number 3 on their keypad.
- Choose how chat messages are assigned either “Take Explicitly” or select “Auto-assign” to ensure chats are marked as ‘Taken’.
Skill-based routing
Skill based routing is only available in the dedicated enterprise edition and only from the Management Console.
3CX Enterprise edition features skill-based routing, which allows queued calls to be distributed to agents based on their skill group.
For example, a call center can assign its support agents in increasing skill-level groups based on their expertise. In this way, incoming calls are first assigned to agents in the level “1” skill group and when not available, move on to the less experienced agents in subsequent skill groups. These skill-based routing strategies are available:
- Ring All – rings the phones of all the agents in this skill group.
- Hunt Random Start – randomly selects an agent to assign the call to, distributing evenly the calls among the agents in this skill group.
- Round Robin – cycles sequentially through all available queue agents in this skill group.
- Fewest Answered – prioritizes available agents who answered the least number of calls in this skill group.
Advanced Queue options
The Enterprise edition also features these additional queue options:
- Wrap-Up Time – gives the agent the specified time in seconds to enter notes into the call record, after taking a call. During this time the agent will not receive any calls.
- Maximum Callers in Queue – when this number is reached, calls are routed according to the settings in the ‘Destination if no answer’ section.
- Priority Queue – prioritize calls from this queue over calls from other queues the agent/extension is a member of. Example: A support team has one queue for normal support calls, and another queue for VIP customers, so even though serviced by the same agents, calls from the VIP queue get priority.
- Queue Statistics Reset – click to reset the queue agent calls and wallboard statistics, or set a periodic schedule for automatic reset. Detailed statistics for the queue, i.e. average call time, average wait time, etc, are visible through the “Agent Status” and “Queue Monitoring” sections on the “Panel” view in the 3CX Web Client.
- Queue Email Notifications – enable to notify the manager for certain queue events, i.e. calls breaching the SLA time limit, queue calls lost, and callback activity.
Paging
Paging is used to make a one-way announcement to a ring group via the phone speaker, without the called party picking up the handset. Paging requires you to set the relevant dial code in “Settings > Dial Codes > Paging”, e.g. *11, and a phone that supports and is configured for intercom.
To add a paging group from “Ring Groups”, click on “+ Add Paging” and enter these options:
- Name – enter a name for the paging group.
- Virtual Extension Number – accept the default or specify an extension number.
- Ring strategy:
- Paging – add the extensions to the page in the section “Group members”.
- Paging Multicast – is suitable for large paging groups and requires phones supporting multicast, on the same local subnet as 3CX. Define the target multicast address to send the audio stream to and then use the provisioning configuration method to configure the IP phone to listen to this address.
- Use the “Add a DID/DDI” button if you need to assign a number directly to the paging group.
- Use the “Click2Talk” tab to set up a custom ‘3CX Talk’ link if required.
- Click “OK” to save.
Intercom
Intercom enables you to make an announcement to a single extension with two-way audio, i.e. the called party can respond without picking up the handset. To call a user via the intercom function, add the paging/intercom prefix in front of the extension number, e.g. if your paging dial code is *11, to make an intercom call to extension 100, dial: *11100.
Configure the intercom dial code in “Settings > Dial codes > Paging”. The extension using intercom needs to have the “Can Intercom” option enabled in “Users > Edit Extension > Rights”.
Firewall & Router Configuration for 3CX - On-Premise Server
If you have 3CX installed on-premise you need to make changes to your firewall configuration to allow 3CX to communicate successfully with your SIP trunks and apps. This guide gives you a general overview of the ports that need to be opened/statically forwarded on your firewall.
If you have remote IP phones, you need to put an SBC or router phone in front of them. Alternatively we recommend the use of our apps which have an inbuilt tunnel. More information on SBC can be found here.
Ports required for your SIP Trunk / VoIP Provider

Open these ports to allow 3CX to communicate with the VoIP Provider/SIP Trunk and WebRTC:
- Port 5060 (inbound, UDP) and 5060-5061 (inbound, TCP) for SIP communications.
- Port 9000-10999 (inbound, UDP) for RTP (Audio) communications, i.e. the actual call. Each call requires 2 RTP ports, one to control the call and one for the call data, so the number of ports you need to open is double the number of simultaneous calls.
Ports required for remote 3CX Apps & SBC
To allow users to use their 3CX apps remotely, on Android, iOS or Windows, you need to ensure that these ports are open:
- Port 5090 (inbound, UDP and TCP) for the 3CX tunnel.
- Port 443 or 5001 (inbound, TCP) HTTPS for Presence and Provisioning, or the custom HTTPS port you specified.
- Port 443 (outbound, TCP) for Google Android Push.
- Port 443, 2197 and 5223 (outbound, TCP) for Apple iOS Push.

PUSH messages are sent by the 3CX System to Extensions using smartphones to wake up the devices for calls. This greatly enhances the usability of the smartphone apps.
Ports required for 3CX Video Conference
To create and participate in web-based meetings, the 3CX-hosted cloud service must be able to communicate with the 3CX PBX and vice versa. To do so, these ports need to be configured:
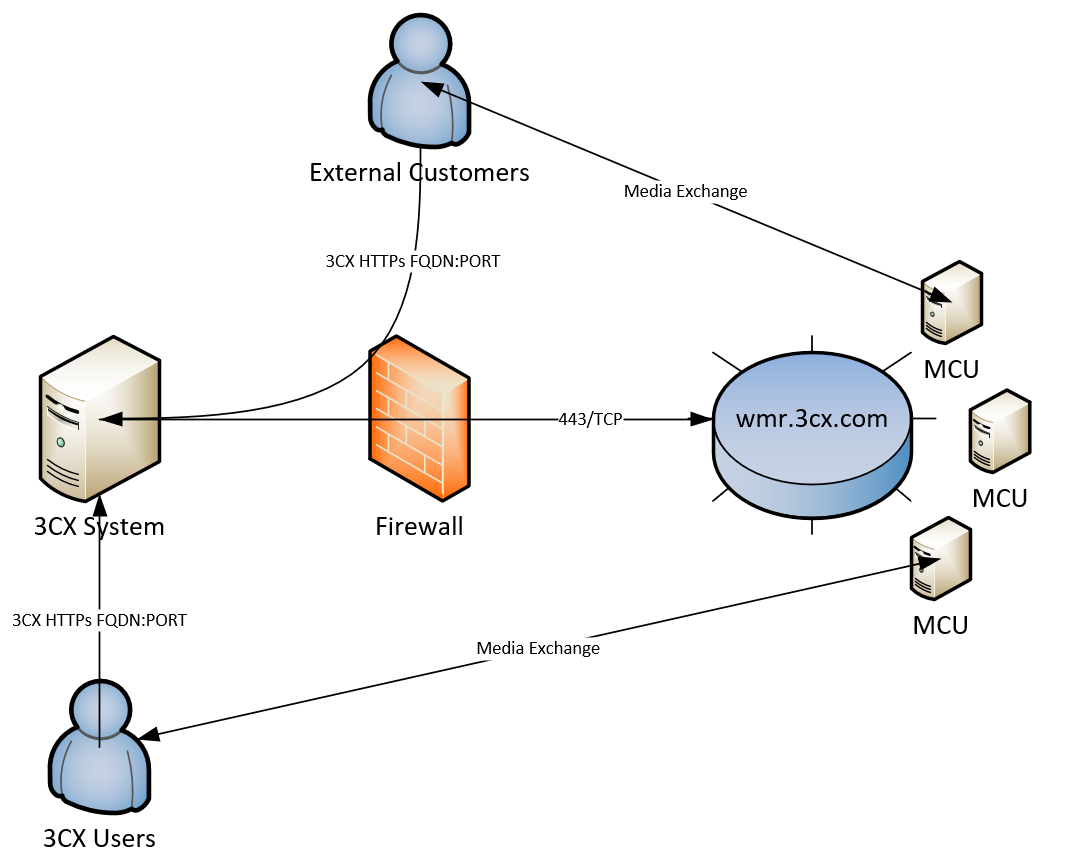
- Port 443 (inbound, TCP) must be allowed for participants to connect your 3CX System
- 3CX System: Port 443 (outbound, TCP) must be allowed to connect to 3CX’s cloud infrastructure
- Users: Port 443 (outbound, TCP) and 48000-65535 (outbound, UDP) must be allowed to exchange audio and video with other participants
Ports required for Other Services (SMTP & Activation)
A 3CX System connects to various services provided by 3CX in the cloud.
- SMTP Service: Cloud Service for SMTP Messages
smtp-proxy.3cx.net, 2528 (outbound, TCP) - Activation Service: Activation of 3CX Products
activate.3cx.com, 443 (outbound, TCP, uninspected traffic) - RPS Service: Provisioning of Remote IP Phones
rps.3cx.com, 443 (outbound, TCP) - Update Server: For updates of 3CX System and firmware of IP Phones
Downloads-global.3cx.com, 443 (outbound, TCP)
Other configuration
- Disable SIP ALG – Use a router/firewall without a SIP Helper or SIP ALG (Application Layer Gateway), or a device on which SIP ALG can be disabled.
- Configure Split DNS – You will need to configure the 3CX FQDN to work both internally on your local network and externally outside of your network (unless you do not want to give access to your phone system from outside the network).
- Run the Firewall Checker – After configuring your firewall, run the 3CX Firewall Checker to verify its configuration!
PBX Dial Codes - How to use them directly from your phone
Dial codes are key/number combinations used to access functions within the phone system directly from your phone. The administrator can change these from the Management Console > “Settings” > “System” > Dial codes”. This section will describe the default dial-codes.

Parking
If you wish to “park” a call and then pick up the call from another extension, you can do so by parking the call in the “Parking orbit”. Alternatively, you can use the “Shared Parking Orbit”. The differences are outlined here.
To park a call
On an established call to your extension start the “blind transfer procedure” and transfer the call to *0[0-9]. For example, *01 will place the call in the parking orbit 1, *02 will place the call in the parking orbit 2, etc.
To pick up a parked call
Dial *10 to *19 where the 0 – 9 is the park orbit number the call was parked in. For example, calling *11 will pick up any calls parked in parking orbit 1, *12 will pick up any calls parked in parking orbit 2, etc.
Parking Multiple Calls
Parking orbits support parking of multiple calls in the same orbit. Therefore, when unparking, you can add the extension number from which the call was parked to be sure that you un-park the correct call.
For example, if extension 100 parked a call in park 0, this call can be picked up by another extension by keying in *10100. Omitting the extension number otherwise un-parks the longest parked call in the particular orbit.
Pickup a call
If you hear a particular extension ringing, and you know that the owner of that extension is not able to take the call, you can take the call by using the “Call Pickup” feature. To do this, type:
*20*<extension number>
This will redirect the active call from the specified extension to your extension. You can also retrieve a call from a ringing extension without specifying the extension number. To do this, type *20* followed by the send key. This will redirect the longest ringing call to your extension.
Change Profile Status
You can change your status by using the dial code in the following manner: *3[0-4]. 0 is “Available”, 1 is “Away”, 2 is “Do not Disturb”, 3 is “Custom 1” and 4 is “Custom 2”.
For example, dialing *31 from extension 100, will change the profile status of extension 100 to Away.
Connect to Voicemail of extension
To leave a message in the voicemail box of a particular Extension: Dial *4<extension number>.
For example, *4100, will leave a voicemail message in the voicemail box of extension 100.
Log extension IN/OUT of queues
To login or logout an extension from Queues you can use the following dial codes:
- Dial *62 to log extensions into the queues
- Dial *63 to log extensions out of the queues
For more information on how to manage queue agent status refer to this guide: https://info.voxtandem.com/books/how-to-guides/page/managing-user-agents-status-in-queues
Paging
The intercom feature allows you to make an announcement to another extension without requiring the other party to pick up the handset. The message will be played via the other phone’s speaker. The audio is two way, and the called party can respond immediately without picking up the handset. Paging is also a group right which must be assigned to an extension. The extension can then use paging within its extension group. If the right is missing, paging calls will be converted to regular calls.
Start an Intercom Call
Prefix the extension you wish to call with *9, followed by the extension. For example, to make an intercom call to extension 100 you should dial: *9100
Important: Intercom dial code is disabled by default. If you want your phone to Auto-answer (only applicable for legacy devices) you need to configure a dial code in the “Settings” > ”System” > “Dial Codes” > “Paging”. This dial code must be unique and must not conflict with any of the other dial codes.
Billing Code
The Billing Code allows you to tag specific calls with Billing codes in order to produce reports. For example, you can have agents use different billing codes when dialing out in order to check total billing for agents or if you are making a call for a particular customer and you will bill them afterwards. To tag calls with billing codes you will need to use ** (default value). This allows you to add a tag to a call you want to make.
For example, whenever you make a call for a particular customer, you want to tag the call with that customer’s billing code (for example 3265), so that you can bill them. When making a call related to a particular customer, the caller is required to dial the number in the following format:
Destination-Number**3265.
For example, if the number is 17771231233, then the caller needs to dial 17771231233**3265
This billing code can be used as a filter in the 3CX Reports (and in particular the Call Report with filter to destination: Match Billing Code) to see how many calls were made using the specific billing code as shown below.

Here we see that the billing code has been entered into the “Match Bill Code” textbox. This will query and display all the calls that were made using the “3265” billing code tag.

Block Outbound Caller ID
You can hide the outbound caller ID on a specific call. To do this just prepend the dialing number with *5. Example: if I want to call the number 004412345678 but I want to do this anonymously, dial *5004412345678 or Outbound rule + *5 + Number. Your outbound caller id will be hidden.
Hotdesking
Hot desking allows multiple users to connect to a local or remote IP Phone, one at a time. Learn more on how to use the 3CX Hot Desking feature.
Logging In
To log into the IP phone the user dials *77* followed by the extension number. If the call gets disconnected with the message “forbidden” make sure that no other “Dial code” starts with *7.
Logging Out
To logout from the device the user dials *77*5.
Hotel - Maid Codes
Maid codes are specific codes which can tell PMS systems the status of a guest room in a hotel. This depends on PMS integration to be pre-configured. The codes vary for Mitel and Fidelio however the concept of how to control the status of the room is the same.
For maid codes to work you must pre-configure an IVR as a Wake-up Call IVR Service:
- Go to “Digital Receptionist” and create or edit an IVR.

- Set the “Type” to “Wake up”. Only one “Wake UP” IVR can be configured.
- Click on “OK” to save.
Let's assume that a maid is in a hotel room and wants to set the room to Dirty/Vacant. From the phone in the room (room = extension number) dial *68<room status> to set the room’s state. Connected PMS systems, such as Fidelio, will be informed to set the room status accordingly. An example for Fidelio, the standard code for Dirty/Vacant is “1”, would be *681. PMS connected users will see that this room is now Dirty/Vacant. The default room status codes supported by MITEL and Fidelio are:
MITEL Protocol:
- Maid Present
- Clean
- Not Clean
- Out of Service
- To be inspected
- Occupied/Clean
- Occupied/Not Clean
- Vacant/Clean
- Vacant/Not Clean
Micros Fidelio:
- Dirty/Vacant
- Dirty/Occupied
- Clean/Vacant
- Clean/Occupied
- Inspected/Vacant
- Inspected/Occupied
Hot Desking
Hot Desking allows local or remote (via SBC) connected IP Phones to be used by multiple users, one at a time. A device currently not used by a user can’t make outbound calls, unless the number is defined as an “Emergency Number”. This way the extension is also protected, with the PIN protection feature, from dialing to unmonitored locations.
Getting Started
To use Hot Desking a PRO or Enterprise license key is required.
To start using hot desking:
- An extension must be allowed to use the pool of hot desking devices and
- A device must be created as a hot desking phone. In order to do so, navigate to “Advanced > Hotdesking” function in the 3CX Management Console and press “+ADD”.
Setting up a device to be used for hot desking:
- Enter the basic details of the device, such as the MAC address and the provisioning method. If SBC is being used, define the IP and Port of the SBC the phone shall use in the remote office. In the “Options” section under the default settings define how the device will operate. Note that the option settings do not change to the user’s preferences when an extension roams onto the device.
- Startup the device (from factory reset state) and provision the device using the Plug'n'Play (PnP) method outlined in the configuration guide for your device at https://www.3cx.com/sip-phones/.
- Use the “Assign Ext” in the “Phones” function to process the PnP request and map to the corresponding hot desking extension number (format HDXXXX) that matches the MAC address of the device created in step 1. The device is provisioned and is ready to be used as a hot desking pool device.
- Grant access to the extension(s) that need to use hot desking devices. Select the extension(s) (press the ‘Ctrl’ key to select multiple) and click “Edit” to enable the option “Enable hot desking” in the “Options” tab > “Options” section.
Logging In
To log into a hot desking device the user dials *77*[Extension Number]* (e.g. *77*100*). The IVR service answers and prompts the user to enter their voice mailbox PIN number. Upon completion a confirmation prompt is played and the device is reprovisioned for the user’s extension.
“Info”: If the user hears “file not found” instead of the login prompt you need to update the system prompt set in “Settings” > “System Prompts” and update all installed and outdated prompts.
Note: If the hot desking device reboots after roaming to the device, update the device firmware to the latest 3CX supported firmware.
Logging Out
To logout from a device the user needs to press the first available BLF button on the device, assigned on all hot desking devices to logout. User-configured BLF extension settings are shifted one position down to accommodate the logout button.
Alternatively, on a device without BLF buttons the user dials *77*5* to logout.
Note: It is possible to roam directly from one extension to the next without logging out in between. While user A is currently on a device just reuse the login process to directly log into the next extension.
Status
The current status of a device can be determined in two ways. Hot desking devices use an extension name as ‘HDXXXX’. If this is shown on the device display then the device is idle. When a user logs into the device via hot desking, the device displays the user's extension number.

In the 3CX Management Console, the “Hotdesking” function shows device(s) status with currently logged-in users or idle. The administrator can force a user logout remotely by selecting the extension and clicking the “Logout” button in the “Hotdesking” function.
Requirements and Limitations
- Custom templates cannot be used when using a device provisioned in hot desking mode.
- CTI is only tested and supported while using the 3CX web client. CTI in hot desking via the 3CX client is not supported and therefore cannot be used.
- To support best BLF layout with the configured settings in Web Client > "Settings" > "BLF Settings" on hot desking phones with variable number of BLFs:
- any empty BLF positions are discarded,
- all displayed BLFs are shifted down by the "Logout" button.
Forbidden at Log-In
If the login call (*77*[EXT]*) gets disconnected with the message “forbidden”, review the configured system dial codes in “Settings” > “Dial Codes" to ensure that no other dial code starts with *7.
Managing User / Agents’ Status in Queues
Call queues are used to better service incoming calls. Queue members are referred to as agents. Queues distribute incoming calls to agents according to the queue the caller has dialed into, which agents are available and if you have any forwarding rules. A single agent can be a member of multiple queues and they are able to log in and out of queues in various ways.
This guide will take you through the different ways of logging in and out of queues. When an extension is created, the default state of agents and their membership in queues is LOGGED IN.
Global LogIn and Logout
The global queue toggle will add an agent to all queues in operative mode or remove them from service. However, it will NOT override explicit queue logouts.
3CX Web Client / Desktop App
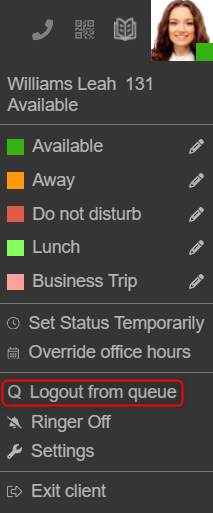
You can easily “Login to queue” or “Logout from queue” by clicking on your user profile in the top right corner of your web client. The option will be applied to all the queues you are a member of.
Deskphone BLF button

Desktop IP phones do not have a “Q” button to log in or out of the queues. In this case you can use one of the phone’s configured BLF keys to login and logout. You will hear an audio confirmation that “This extension is logged into the queue”. You can also log out from the queues using a separate logout BLF button followed by an audio confirmation.
Deskphone dial codes
Some IP Phones do not have BLF keys. In this case, you will need to use dial codes, which are provided by the PBX to log in and out of queues. The dial codes are defined in the 3CX Management Console and configured by the PBX Administrator.
- By default the dial code to log IN to a queue is *62
- By default the dial code to log OUT of a queue is *63
Automatically based on the user’s profile status
An agent can be automatically logged in or out of queues, depending on the user’s profile status. For example, when the agent is “Available” the agent will be logged in to the Queues automatically. When the agent chooses “Away” or “Do Not Disturb” the agent will be automatically logged out from the queues.
Automatically based on the time of day
The administrator can also configure a user’s status to automatically change based on the time of day and the queue status will change accordingly. The extension can either follow the office hours of the PBX or follow specific office hours defined for the extension. The extension can also have specific break times. The agent will then be logged in or out accordingly.
- During Office Hours, the extension will be in the “Available” state
- During Out of Office Hours, the extension will be in the “Do Not Disturb” state
- During Break Times, the extension will be in the “Away” state
Explicit (Selective) LogIn and LogOut
An agent can choose which queue to join and they can be a member of more than one queue. In this case, the panel can be used to select which individual queues an agent will be logged in to.
3CX Web Client / Desktop App

Use the 3CX Web Client/ Desktop App to log in and out of individual queues:
- Go to “Panel”.
- Select one of the available queues from the top right dropdown beneath your profile.
- Click on the “Logged in / Logged out” indicator to login or logout of this queue.
Queue managers can login / logout on behalf of
The explicit login and logout can also be done on behalf of the agent, by the assigned queue manager(s). Agents who are not queue managers can only log themselves in and out of queues.
CALL REPORTS - COMPLETE GUIDE TO 3CX REPORTS
Part 1: Agent Performance Reports
Performance reports are used to monitor agent productivity whilst at work. They can help identify high achievers or those that might be taking it a bit too easy!
User Activity Graph
The “User Activity Graph” shows the progress and activity of an extension, so a manager can see which are the busiest periods of the day, month, or year. By default, it includes queue calls and can also show internal calls, if the option “Include Internal Calls” is enabled.
Extension Statistic Report
The extension statistic report shows the answered/unanswered calls for a single agent or an extension range. The report automatically separates inbound and outbound calls, and then shows the combined total. When scheduling the report you can choose to include all calls or exclude internal/external calls as required.
Ring Group Statistics
The extension statistic report shows the answered/unanswered calls for a single agent or an extension range. The report automatically separates inbound and outbound calls, and then shows the combined total. When scheduling the report you can choose to include all calls or exclude internal/ external calls as required.
Call Distribution
The call distribution graph displays calls made to and from trunks, gateways, and bridges. By default, it will include Queue calls unless the option “Include Queue calls” is unchecked. The report also reflects calls made to ring groups and may include internal calls if the option “Include internal calls” is checked.
Agents in Queue Statistics
This report shows you vital statistics for the agents logged into your call queues.
Here’s what’s included:
- Total time logged in
- Calls: Number answered, % serviced and number answered per hour
- Ring time: Total ring time and the mean average
- Talk time: Total talk time and the mean average
Part 2: Quality of Service Reports
Quality of service reports helps queue managers to monitor the experience of customers dialing in.
Agent Login History
The agent login history report shows queue managers how often their agents are logging in and out of call queues, which can highlight agents who are perhaps not performing as they should be! The report shows you by day the exact time agents login and out of the queue. It then shows you the total time the agent has spent logged in by day and their total talk time.
Call Reports
The clue’s in the name for this one! A call report will show you all the calls made according to set parameters. You can choose to include calls from certain numbers, ranges, and extension groups e.g. you might want a report only showing calls from internal extensions or numbers starting with (99) for example. In the same vein, you can choose to show calls to certain numbers. Finally, you can select answered and/or unanswered calls as well as opt to exclude ringing time.
Average Queue Waiting Time
The “Average Queue waiting Time (Graph)” is a frequency curve graph. It reflects the “Average wait time in seconds before an agent answers“ and the “Average waiting time in seconds before callers hang up“ for a specific queue or all queues.
Queue Answered/ Unanswered Calls
The “Queue Answered/ Unanswered Calls Graph” shows the progress and activity of “All Queues” or “Individual Queues”. The bar graph will reflect answered & unanswered calls by all the agents in the Queues.
Queue Answered Calls
The “Queue Answered Calls Graph” shows the progress and activity of “All Queues” or “Individual Queues”. The bar graph will reflect answered calls by all the agents in the Queues.
Queue Unanswered Calls
The “Queue Answered Calls Graph” shows the progress and activity of “All Queues” or “Individual Queues”. The bar graph will reflect unanswered calls by all the agents in the Queues.
Statistic SLA
The statistic SLA report shows you the total number of calls received for one or multiple queues, then shows you the number and percentage of those calls that missed the set SLA. You also have the option to exclude calls that were dropped before a specific amount of time (this is customizable).
Breaches SLA
Trunk DID
In each queue, you can configure the SLA time, which is the acceptable waiting time for your customers calling your queues. This report returns how many calls were waiting in your queues beyond the configured SLA. The report will highlight the time the calls came in, the caller ID, and the length of time they were asked to wait before reaching an agent. You also have the option to exclude calls that were dropped before a specific amount of time (this is customizable).
This report tells you how many calls were received on each of your External Numbers/DIDs.
Queue Performance Overview
The queue performance overview report aims to summarize the service level for one or multiple queues. The report will show you how many calls were received, serviced, and unserviced by queue and it automatically breaks the statistics down by agent, so your clients can quickly identify their star colleagues.
Detailed Queue Statistics
The detailed queue statistics report will give you all the information needed to assess the performance of your queues. The statistics are shown in the report include:
- Calls: Answered, abandoned, total and % serviced
- Ring Time: The total and mean average
- Talk Time: The total and mean average
- Callbacks: The number of successful callbacks.
Team Queue General Statistics
The “Team Queue General Statistics Report” report focuses on your queues performance at a team level, rather than at an extension level. It shows how many agents are in each queue and provides information on how calls are serviced when they enter.
Team Queue Lost Calls
The “team queue lost calls” report focuses on how many calls entered a queue but were not answered by an Agent. It provides a quick overview of how many calls went unanswered and helps queue managers to get an idea of how long the caller needs to wait in total (e.g. the waiting Time).
Abandoned Queue Calls
The abandoned queue calls report shows the statistics that can help queue managers identify the reasons for abandoned calls. These include: waiting time, the caller ID, the agent who received the call, the number of polling attempts, and the agent’s state at the time of the call.
Queue Answered Calls by Wait Time
This report breaks down the answered calls in a given queue, in order of the time they were waiting to be serviced by an agent. The report highlights the call destination, the caller ID, the ring time, and the answer time.
Queue Callbacks
The queue callbacks report highlights the number of callers who requested a callback before they were able to be serviced by an agent. The report will tell you how many calls the queue received, how many callbacks were made, and how many callbacks failed (in other words, the call wasn’t answered by the intended recipient).
Queue Failed Callbacks
The failed callback report provides more detail on unsuccessful callbacks to help you improve customer service for your clients. The report shows the time the call was made, the queue it was called from, the callback phone number, and the ringing time.
Downloading your 3CX Video Conference Recording
What to do when you don’t receive your Web Meeting report email.
Video recording, video recording, where art thou video recording! You've just had a productive and successful Web Meeting session. You're now eagerly waiting for the report email with the recorded video. To your surprise the email hasn’t arrived! Worried that it’s gone and lost forever? Worry not! There are several possible reasons for this. Read on to learn more about the delay as well as the steps you can take to get your recording.
Identifying the Issue
There are 3 main reasons you don’t get your Web Meeting report email. Here’s the recap:
Conversion Delay: Be Patient
There’s nothing wrong. Be patient! The email will arrive once the conversion is finished. Long meetings with several HD video participants and whiteboard can take longer to convert. In some extreme cases this can take many hours.
SPAM / Bounce: Check It
24 hours have passed? The email may have been filtered as SPAM - or bounced by your SMTP server. Double check your SPAM folder, the email might be there. Add noreply@3cx.net to your address book. If you have a custom SMTP, ask the email server administrator to whitelist o3.smtp.3cx.net to ensure our emails are always properly delivered.
Conversion Error: Unlikely
Something’s gone wrong with your recording conversion. There might be a server error or some anomaly in your recording. Conversion errors are unusual. In this case, however, our engineers are alerted immediately with an error email. They then work to fix the problem as soon as possible. Once the conversion has been rescheduled and completed successfully you’ll receive the email you’ve been waiting for.
Still No Email? 7 Days to Download Before Deletion!
Even if you haven't received the Web Meeting Report email, it’s likely that the conversion was still successful. However, you must take action. Your mp4 file is stored for 7 days only. If you need the recording, you must download it before it gets deleted!
Getting the MP4 Url to Download Your Recording
If 24 hours have passed and you’ve still not received your Web Meeting report, get your PBX administrator involved. Ask them to check the PBX logs - specifically the WebMeeting.log. It needs to be the one related to your meeting date and time. Ask them to search for “FinishedConversion”. You should find the mp4 url with your recording.
If your PBX doesn’t save logs - or you don’t have access to them - no problem! You can use Web Meeting API to retrieve your past meeting reports. Activate your WebMeeting API key from your PBX, in Settings / Conferencing. Copy your API key and run this command from any computer with curl installed:curl --location 'https://YOUR-PBX-FQDN:YOUR-PBX-PORT/webmeeting/api/v1/reports/ORGANIZER-EXTENSION-NUMBER'
--header '3CX-ApiKey: YOUR-API-KEY'
- YOUR-PBX-FQDN is the FQDN of your PBX, for example mycompany.my3cx.eu
- YOUR-PBX-PORT is the TCP port your PBX is listening on, usually 443 or 5001 (If it's 443, you can omit the port)
- ORGANIZER-EXTENSION-NUMBER is the extension number of the organizer who created the meeting, for example 100
- YOUR-API-KEY is the string you copied from conferencing API settings page
Example command:curl --location 'https://mycompany.my3cx.eu:5001/webmeeting/api/v1/reports/100'
--header '3CX-ApiKey: dRBeKhbapjMinFmECMJaqtPPNvafNSFXtJeeYNxRU2GkEeudJ7TZ5kWHAht2CFSb'
You’ll get a JSON reply with all meetings hosted by the specified extension in the last 30 days. You can rebuild the report from there and also get the recording URL. If you’re getting too many meetings, filter them using startDate and endDate parameters. Check here for full documentation: https://documenter.getpostman.com/view/17439253/UUxzBnmk#6c3c8624-215a-4714-bd18-b8993a81e34f
Ask in the 3CX Video Conferencing Forum
Still no luck? Contact our Web Meeting support in the forum here: https://www.3cx.com/community/forums/video-conferencing/
You’ll be asked to send details about your Web Meeting session in a private message. This is to allow further analysis. Our dedicated engineers will work closely with you to recover your recording.
Experiencing delays or issues with receiving your Web Meeting report email can be frustrating. As you’ve seen there are multiple avenues to explore to solve your problem. By following the steps outlined above, you can maximize your chances of retrieving the report and accessing your valuable meeting recordings. Remember, our support team is always ready to assist you in any way possible.
Park & Pickup a Parked Call
Introduction:
Parking a call is similar to putting a call on hold with the difference that you can then pickup the call from another device. 3CX includes this feature in all editions, including Free.
Parking a Call - IP Phone
- BLIND Transfer Button followed by *00 to 09 to specify the parking Orbit.
- For example *01 will place the call in the parking Orbit 1.
- For example *02 will place the call in the parking Orbit 2.
Picking up a parked call
- *10 to 19 where the 0 – 9 is the park Orbit number
- For example *11 will pick up any calls parked in parking Orbit 1
- For example *12 will pick up any calls parked in parking Orbit 2
Multiple Calls in Parking Lots
Parking lots support parking of multiple calls. Therefore, when un-parking, you can add the extension number from which the call was parked to be sure that you un-park the particular call you had initially parked there.
For example, if extension 100 parked a call in park 0, this call can be picked up by extension 101 by dialing *10100.
Examples for Popular IP Phones
Some examples to park a call with popular phones:
- Yealink - press the TRANSFER button and dial *00, from the screen, then choose B Transfer.
- Snom – press the TRANSFER button and dial *00.
- Polycom – press the TRANSFER button, from the screen, then choose the option BLIND and then dial *00.
How to Manually Override Office Hours in 3CX V20

To override office hours, you need to log in to the Web Client:
- Use your unique link to access your 3CX Web Client (e.g., https://yourdomain.3cx.us).
- Enter your email address or extension number as the username, and then the password.
- If you’ve forgotten your password, an authorized person can request a reset providing a unique email address linked to your extension.
- Only users with Receptionist or higher permissions can manually override office hours.
Once logged in, follow these steps (see below pictures for more information):
- Access User Status
- Click on user’s status avatar (with the green square) in the top right-hand corner of the Web Client
- Select Override Option
- From the menu, choose “Override Office Hours”.
- Set Office Hours
- Click on the “Override office hours to” drop-down list.
- Select “Office is Closed” to route calls as if it’s after hours.
- Restore Default Hours
- To return to normal, select “Reset default office hours” from the same menu.
- This will re-enable the automatic office hours switch.

Note: When you override office hours, the system stays in the selected mode (Open or Closed) until you manually switch it back or reset to default.
This allows you to quickly manage office hours without needing to reconfigure schedules.
Quick Response Templates for SMS & Chat
New template icon in the chat bar
![]()
Once a template has been created, simply click on any chat message and then click on the 'Template' icon in the response bar. Now you will be able to click the ‘+ Add category’ button to start setting up your templates and organizational structure.
Keep them organized and easy to find
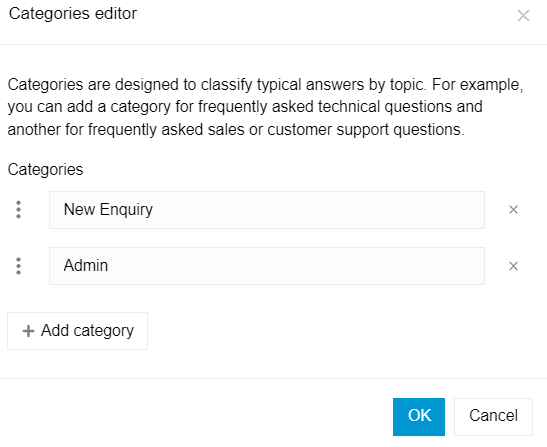
Imagine you have a customer support team of 100 different agents all working in different departments or teams (e.g sales and support). Their quick response template requirements will all be different. That is why we created template categories. By designating each template into a separate category, agents will be able to view their team's responses easily.
16 different language categories
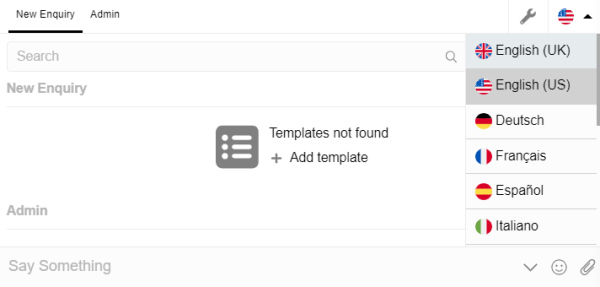
Now imagine those 100 team members servicing customer queries across all time zones and in different languages. Quick reply messages can not only be split up into categories but also created in 16 different language categories. This is a key component as responses in different lands will have a different tone or manner when responding.
Quick lookup search box

Sorting templates into categories and languages is a great way to keep all of your responses organized. However, as each template is able to be given a template name, agents can use the search box to find the desired message quicker. The search box doesn't just search template titles but also the message text. This means that an agent can obtain the relevant information like the customer name, or other contact information quicker in order to resolve the query.
Placeholders give it a personal touch
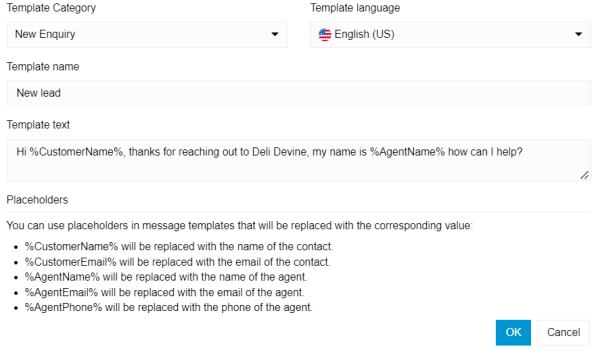
The idea behind creating quick response templates is to service customer requests quicker. But with speed, the client/visitor could get the feeling they are just being fed canned responses by some chatbot. Personalized placeholders will help with this. By setting up your templates to include these placeholders, you are able to quickly and easily make the customer feel valued and put that personal touch back into the conversation. Available placeholders are:
- %CustomerName% will be replaced with the name of the contact.
- %CustomerEmail% will be replaced with the email of the contact.
- %AgentName% will be replaced with the name of the agent.
- %AgentEmail% will be replaced with the email of the agent.
- %AgentPhone% will be replaced with the phone of the agent.
So for example, Joe Schmoe has sent a WhatsApp text message to a company. The first agent to respond clicks the 'Take' button and then selects the 'New lead' welcome message template which has been set up as:
Hi %CustomerName%, thanks for reaching out to Deli Devine, my name is %AgentName%, how can I help?
Joe would then get the following message.
Hi Joe Schmoe, thanks for reaching out to Deli Devine, my name is Brandon Moran, how can I help?
Click, edit & send
An agent, however, does not have to use all the content of a templated response. Once a response has been clicked on, the message is not immediately sent. The response bar is populated with the message which then allows an agent to amend the response if needed.
Configure Your Office Hours & Holidays
Configure Office Hours
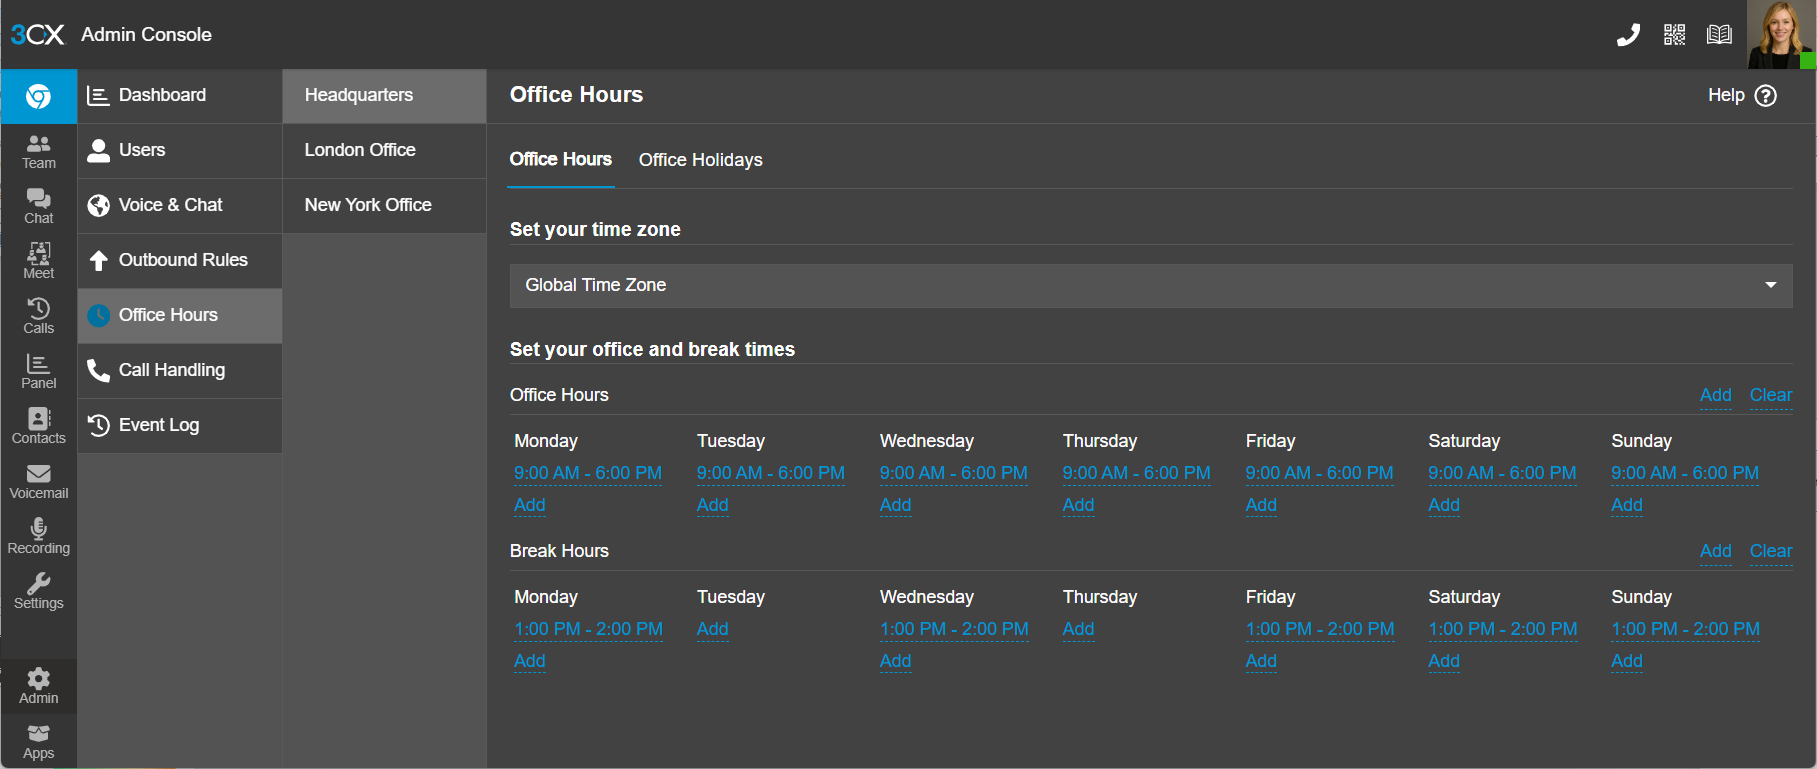 (Configuring Office Hours in 3CX Admin Console)
To configure your office hours:
- In the 3CX Admin Console go to “Office hours”. Select the department you want to configure the office hours for. (3CX FREE/SMB don't have departments so you can skip this step).
- Click on the days and specify your opening hours.
- Add any breaks.
- Use the “Add” and “Clear” button for each section to add or remove times for every day of the week in one single bulk action.
- If this group is in a different time zone, set the time zone at the bottom of the page.
- Repeat this process for each group.
How to Update and Maintain a Holiday Schedule in 3CX Version 20
These instructions explain how to update and maintain holiday schedules in 3CX Version 20 (V20) so your phone system handles calls properly during holidays and office closures.
Accessing Holiday Settings
- Log into the 3CX Admin Console.
- From the left-side menu, select:
Admin → Office Hours & Holidays
- Click the Holidays tab.
Adding a New Holiday
- Click Add Holiday.
- Complete the following fields:
Holiday Name
Enter a descriptive name such as:
- Christmas Day
- Thanksgiving
- Independence Day
Date
Choose the holiday date.
Recurring Holiday
Enable Repeat yearly if the holiday occurs on the same date every year.
Examples:
- Christmas → yearly recurring
- New Year’s Day → yearly recurring
For floating holidays like Thanksgiving, update them manually each year.
Applying Holidays to Office Hours
In Version 20, holidays work alongside office hours.
Verify that:
- Office Hours are enabled
- Your inbound rules use office hours routing
- The holiday schedule is assigned globally or to the appropriate department
To verify:
- Go to:
Admin → Office Hours & Holidays
- Confirm the holiday appears in the active holiday list.
Editing an Existing Holiday
Admin → Office Hours & Holidays → Holidays
- Click the holiday you want to update.
- Modify:
- Name
- Date
- Recurrence
- Routing destination
- Greeting
- Click Save.
Deleting a Holiday
- Open the holiday list.
- Select the holiday.
- Click Delete.
- Confirm deletion.
Best Practices for Maintaining Holiday Schedules
Review Holidays Annually
At the beginning or end of each year:
- Confirm all holidays are entered
- Update floating holidays
- Remove outdated entries
Commonly Missed Holidays
Many organizations forget to include:
- Christmas Eve
- New Year’s Eve
- Black Friday
- Company shutdown days
- Emergency/weather closures
Troubleshooting
Holiday Routing Not Working
Verify:
- The holiday date is correct
- The system timezone is correct
- Office Hours are enabled
- Inbound rules follow office hours routing
Calls Continue Ringing Normally
Check:
- The holiday is enabled
- The correct destination is selected
- The inbound rule points to the proper department or office hours profile
Recommended Annual Maintenance Process
A simple yearly process:
Every December or January:
- Review all holiday entries
- Update variable-date holidays
- Record updated greetings if needed
- Test inbound call routing
This helps prevent missed calls and ensures callers receive accurate messaging during office closures.