Call Queues & Ring Groups

3CX allows you to create call queues or ring groups to handle incoming calls as a team:
- “Ring Groups” route calls concurrently to multiple phones via virtual extensions.
- “Call Queues” allow calls to be queued so that agents can take calls when they are available. If all agents are busy, calls are kept waiting until an agent is available. The Call Queue feature is only available in 3CX SMB and dedicated instances running PRO and Enterprise editions.
Ring Groups
3CX FREE includes a default ring group that includes all your team members. Calls will be forwarded to this ring group and it will ring the team members one after the other. That way, if one is unavailable, another team member can answer. You can change this behavior and exclude team members from the ring group. In the 3CX SMB, PRO and Enterprise editions, you can create your own ring groups.
To edit your ring group or create a new ring group:

- Go to “Admin > Call handling”.
- Click on your existing ring group or click “+ Add ring group” to create a new group.
- If you are creating a new group, type a name. Something like ‘Sales Team’.
- Use the drop-down box to assign a DID number that will route directly to your ring group.
- Specify what should happen if no one answers the call. Default ringing timeout is 60 seconds.
- Edit the ring strategy
- Ring all – Does what it says. Rings all group members at the same time until someone picks up or the 60-second timeout is reached.
- Prioritized hunt – Means it will start with the top group member and proceed down the list. That means that the first ring group member will receive each and every call!
Call Queues
Queues go way beyond ring groups and are much cooler. A queue will take the call and put the caller in the queue if you cannot take the call immediately. To configure a queue:
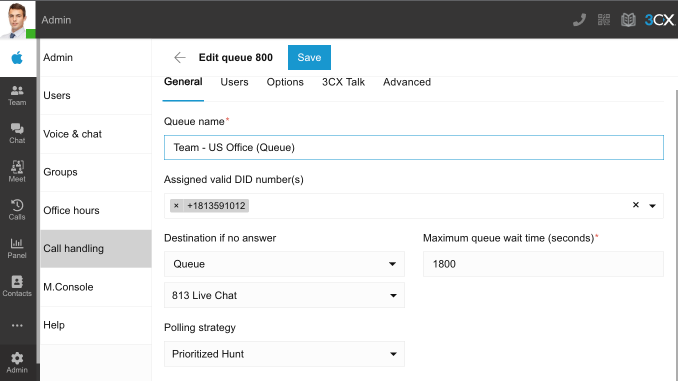
- Go to “Admin > Call handling”.
- Click “+ Add queue” at the top of the screen.
- Under the “General” tab:
- Give your queue a name.
- Select a DID to be assigned to this queue. That routes calls to this number to this queue.
- Specify what should happen if no one answers the call. By default, the call will be ended.
- Choose your maximum queue wait time. That’s the length of time a caller will be held in the queue before their call follows the “Destination if no answer” route.
- Select the polling strategy:
- Prioritized Hunt – Distribute calls according to the order specified in the ‘Users’ section. i.e. all calls go to the first user, and only if this user is busy, the calls go to the next user. This strategy can be used to set up skills-based routing, by prioritizing the agents according to their skills.
- Ring All – ring the phones of ALL the agents.
- Hunt Random Start – Randomly choose an agent to distribute the call to and evenly distribute calls among available agents.
- Round Robin – Sequentially cycle through agents logged in the queue, i.e. the first call is sent to agent 1, the second call to agent 2, and so on.
- Longest Waiting – Forwards the call to the user waiting for the longest.
- Least Talk Time – Forwards the call to the user with the least total talk time.
- Fewest Answered – Forwards the call to the user who answered the least number of calls.
- Hunt by Threes Random – Sends the call simultaneously to 3 random users.
- Hunt by Threes Prioritized – Forwards the call simultaneously to 3 users at a time as prioritized in the “Users” section.
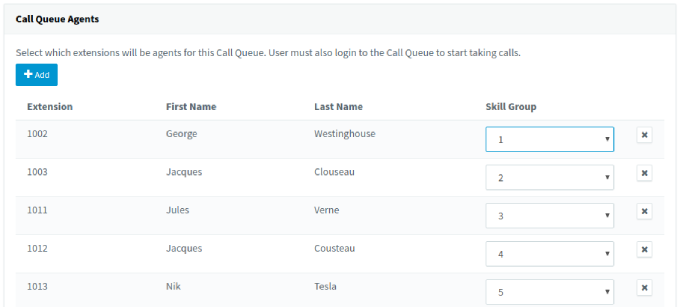
- Now you need to assign “Users” to answer the calls. Go to the “Users” tab. Use the “+ Add user” button to choose which team members will be part of the queue. Watch out for the order of users as some of the polling strategies work from the top of the list to the bottom.
- Go to the “Options” tab:
- You can choose a different music on hold. Ensure the file is in WAV format. You can use our audio converter tool.
- You can upload a greeting or record your own. To record your own greeting with something like ‘Thank you for calling Company XYZ’:
- Click the “Record” button.
- Enter your desired file name and click the “Record” button.
- The popup will show your recording time. When finished, click the “Stop” button.
- You can now listen to your greeting, re-record it or click the upload button to save.
- Your recording will now be shown in the drop-down box. If you do not see the “Record” button, ensure your microphone is properly configured and allowed in “Settings > Audio/Video”.
- “3CX Talk” lets you name the ‘3CX Talk link’ for the queue, and lets you choose the information you want customers to provide prior to the call being initiated. Once configured, copy the URL and use it in email signatures, websites, or digital business cards.
- Click “Save” at the top of the page.
Important: Queue members must be logged in a call queue to start answering calls. You can configure queue member extensions to automatically log in and out by enabling their “Forwarding Rules > Statuses > Options > Log out from queues” option for each status profile via the Management Console, or disable users logging out manually.
Advanced Options
3CX features a number of advanced customization options located under the “Advanced” tab:
- “Allow call back” – the customer can choose to be called back instead of waiting in the queue. This option can be triggered either by:
- “Triggered on user request (Press 2)” – the call back will be requested by the caller by pressing “2”
- “Offered to caller after” – the caller will be offered to called back after the queue time specified expires
- “Record Calls” can be enabled and callers can be offered the chance to opt-out by pressing the number 3 on their keypad.
- Choose how chat messages are assigned either “Take Explicitly” or select “Auto-assign” to ensure chats are marked as ‘Taken’.
Skill-based routing
Skill based routing is only available in the dedicated enterprise edition and only from the Management Console.
3CX Enterprise edition features skill-based routing, which allows queued calls to be distributed to agents based on their skill group.
For example, a call center can assign its support agents in increasing skill-level groups based on their expertise. In this way, incoming calls are first assigned to agents in the level “1” skill group and when not available, move on to the less experienced agents in subsequent skill groups. These skill-based routing strategies are available:
- Ring All – rings the phones of all the agents in this skill group.
- Hunt Random Start – randomly selects an agent to assign the call to, distributing evenly the calls among the agents in this skill group.
- Round Robin – cycles sequentially through all available queue agents in this skill group.
- Fewest Answered – prioritizes available agents who answered the least number of calls in this skill group.
Advanced Queue options
The Enterprise edition also features these additional queue options:
- Wrap-Up Time – gives the agent the specified time in seconds to enter notes into the call record, after taking a call. During this time the agent will not receive any calls.
- Maximum Callers in Queue – when this number is reached, calls are routed according to the settings in the ‘Destination if no answer’ section.
- Priority Queue – prioritize calls from this queue over calls from other queues the agent/extension is a member of. Example: A support team has one queue for normal support calls, and another queue for VIP customers, so even though serviced by the same agents, calls from the VIP queue get priority.
- Queue Statistics Reset – click to reset the queue agent calls and wallboard statistics, or set a periodic schedule for automatic reset. Detailed statistics for the queue, i.e. average call time, average wait time, etc, are visible through the “Agent Status” and “Queue Monitoring” sections on the “Panel” view in the 3CX Web Client.
- Queue Email Notifications – enable to notify the manager for certain queue events, i.e. calls breaching the SLA time limit, queue calls lost, and callback activity.
Paging
Paging is used to make a one-way announcement to a ring group via the phone speaker, without the called party picking up the handset. Paging requires you to set the relevant dial code in “Settings > Dial Codes > Paging”, e.g. *11, and a phone that supports and is configured for intercom.
To add a paging group from “Ring Groups”, click on “+ Add Paging” and enter these options:
- Name – enter a name for the paging group.
- Virtual Extension Number – accept the default or specify an extension number.
- Ring strategy:
- Paging – add the extensions to the page in the section “Group members”.
- Paging Multicast – is suitable for large paging groups and requires phones supporting multicast, on the same local subnet as 3CX. Define the target multicast address to send the audio stream to and then use the provisioning configuration method to configure the IP phone to listen to this address.
- Use the “Add a DID/DDI” button if you need to assign a number directly to the paging group.
- Use the “Click2Talk” tab to set up a custom ‘3CX Talk’ link if required.
- Click “OK” to save.
Intercom
Intercom enables you to make an announcement to a single extension with two-way audio, i.e. the called party can respond without picking up the handset. To call a user via the intercom function, add the paging/intercom prefix in front of the extension number, e.g. if your paging dial code is *11, to make an intercom call to extension 100, dial: *11100.
Configure the intercom dial code in “Settings > Dial codes > Paging”. The extension using intercom needs to have the “Can Intercom” option enabled in “Users > Edit Extension > Rights”.