
3CX Quick Start Guide
Using your 3CX Desk Phone
To make a call:
- Dial the number on the keypad and hit the send button.
- OR select a contact or extension from your Web Client or a number from a web page, hit call.
- The Web Client triggers the call on your desk phone if selected via the phone selector toggle.
To transfer a call:
- For blind transfer: Press “Transfer”, dial the extension, press send/dial and hang up.
- Attended transfer Yealink: Press “Transfer”, dial number or select extension, press “Send”, announce the caller, press “Transfer” and hang up.
Connect to Voicemail of extension:
- To leave a message in the voicemail box of a particular Extension: Press “Transfer” , then Dial *4. For example, press ‘Transfer’, then *4100, will leave a voicemail message in the voicemail box of extension 100.
Using Shared Parking (Available ONLY on Physical Desk Phones):
- By default, there are 2 Shared Parks set up on your system, SP 1 and SP 2. There is a limit of 1 person per Shared Park. If additional Shared Parks are needed, contact your system administrator for setup.
- To use a Shared Park, while on an existing call, simply press an available (GREEN) Shared Park (SP #) button on your phone. The calling party will be placed on HOLD listening to music awaiting pickup.
- To pick up a Shared Park, simply press the occupied SP button (RED) with your calling party on hold from any telephone in the office.
Using Orbital Parking (Available for Physical Desk Phones / WebClient / Mobile App):
- Parking the Call - BLIND Transfer Button followed by *00 to 09 to specify the parking orbit.
- For example *01 will place the call in the parking Orbit 1. *02 will place the call on Orbit 2.
- Picking up a parked call - Dial *10 to 19 where the 0 – 9 is the park orbit number
- For example *11 will pick up any calls parked in parking Orbit 1. *12 will pick up any calls parked in parking Orbit 2.
- For more detailed information, click HERE
Using Do Not Disturb (DND):
- The Do Not Disturb feature allows you to reject all incoming calls. This can be useful when trying to focus on that big project or if you are away from your desk. All calls will automatically be redirected to your extension voicemail.
Using History:
- Your phone provides a record of all incoming / outgoing calls made. By clicking the History button you will have access to the following categories – All Calls / Missed Calls / Placed Calls / Received Calls / Forwarded Calls.
Using 3CX Phonebook / Contact Directory:
3CX has a rich contact directory called 3CX Phonebook. Using 3CX Phonebook, you can add, manage, and access contact information from whatever platform you’re using, desktop or mobile. You can add company-wide contacts or personal contacts.
Here’s how you add a contact to 3CX Phonebook:
- Login to your 3CX Web Client
- Click Contacts on the left menu bar
- Choose Company or Personal Phonebook
- Click the plus-sign (+)
- Enter Contact information
- Click the SAVE button (looks like a floppy disk)
Force 3CX IN or OUT of Office – Emergency Code
Setting 3CX to In Office Hours
If the Administrator dials *641 (appends a 1 to the code), a prompt will be played stating that “3CX is now set to IN OFFICE HOURS”. This means that the PBX will disregard the current time, or day (even if it is a holiday) and set all the routes of the Gateways, VoIP Providers and DID/DDI’s to route to the In Office hours destination.
Setting 3CX to Out of Office Hours
If the Administrator dials *642 (appends a 2 to the code), a prompt will be played stating that “3CX is now set to OUT OF OFFICE HOURS”. This means that the PBX will disregard the current time, or day (even if it is 10am for example) and set all the routes of PSTN Gateways, VoIP Providers and DID/DDI’s to route to the Out of Office hours destination.
For more information, visit Manually Enable / Disable Night Mode!
Voicemail
Setting your Voicemail Greeting:
- By phone:
- Dial “999” or simply press the “MESSAGE” button on your phone
- Enter your PIN and then press “#”.
- Select option “8” and then “0” to record.
- Press “#” to end recording and “0” to save.
- From the web client:
- Go to “Settings” > “Greetings”
- From here you can set a greeting according to your status.
To Playback Voicemail:
- By Phone:
- Dial “999” or hit “Voicemail/Message”
- Enter your PIN, press “#” (if required) and then “*” to play your messages.
- During playback of voicemail, you have these options:
- 0 –Skip to the next message.
- 1 –Skip to the previous message.
- 2 –Repeat current message.
- 3 –Delete the current message and automatically go to the next message.
- 4 –Call Back –this will trigger a call to the caller ID of the person who left the message.
- 5 –Forward message to another extension.
- 9 –To go to the Voice mail options menu.
- # –To hang up the call.
- Web Client: Click on “Voicemail” and click the playback icon to listen to the message on your selected phone.
- Android & iOS App: Tap on the burger menu and select “Voicemail”, tap on the voicemail and select “Play” to listen to the message.
Voicemail Message Prompts:
- To play available voicemails press “*”
- To change profile status press “1”
- Press 1 for Available
- Press 2 for Away
- Press 3 for Out of Office
- Press 4 for Custom Profile 1
- Press 5 for Custom Profile 2
- To dial a number press “3”
- To delete all read messages press “4”
- To change your self-identification message “5”
- To record new self-identification message press “0”
- To delete message press “1”
- Check current self-identification message press “2”
- To exit, press “#”
- To play mailbox information press “6”
- To change voicemail pin number press “7”
- To change your greeting message press “8”
- To repeat the prompt press “9”
3CX Web Client Introduction
The 3CX Web Client is a browser-based app. It combines all the features you need to easily and efficiently communicate, collaborate and connect with colleagues, partners, and customers. From this one interface, you can manage calls, view the status of colleagues, hold a video conference, and connect via voice, live chat, WhatsApp, Facebook, and SMS/MMS.
Get started: Logging on

- Open your “Welcome to 3CX | Your Account Details” email.
- If your admin has enabled SSO for Google Or Microsoft, sign in with those credentials.
- If not, click on the “Set your Password” link specified in your email and set your password.
- Log in using your email or extension number and your newly set password.
Note: Your System Admin can enable 2 Factor Authentication for extensions from within the admin console.
Install the Web Client as an app (PWA) - Google Chrome
")
- Click on the download icon in your browser’s address bar as shown above.
- A new dialog will open, click on the “Install” button.
- You will be asked if you would like to pin 3CX (PWA) to your taskbar. We suggest clicking on “Yes” for easier access.
- The Web Client as a PWA app is now installed.
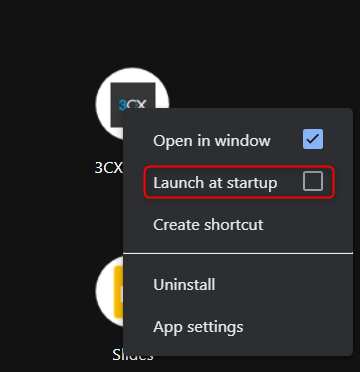
- Enable the app to launch at startup. Type ‘chrome://apps’ into the address bar. Right click on “3CX” and enable “Launch at Startup” as shown above.
Install the Web Client as an app (PWA) - Microsoft Edge

- Login to your web client.
- Click on the icon highlighted above in your address bar.
- Click “Install”.
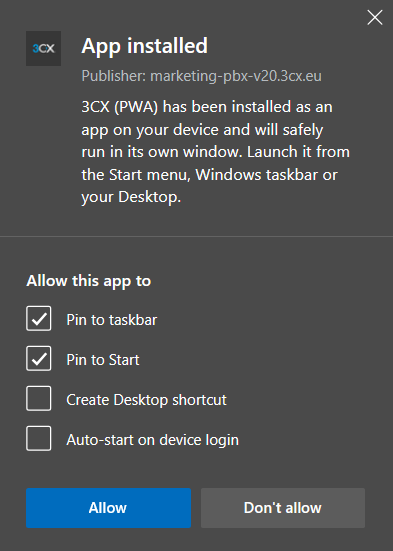
- A new dialog will appear. Select the last 2 options and click “Allow”.
- You will be asked if you would like to pin 3CX (PWA) to your taskbar. We suggest clicking on “Yes” for easier access.
- Installation is complete.
Click2Call Browser Extension
The 3CX Click2Call Browser extensions for Google Chrome and Microsoft Edge enable you to initiate calls from any website or CRM system. Phone numbers appear “hyperlinked”, for you to simply click on and ‘send’ the number to the 3CX Web Client or Desktop App to place the call.
Installing the Browser Extension
- Install the Google Chrome extension.
- Install the Microsoft Edge extension.
- Follow the installation steps.
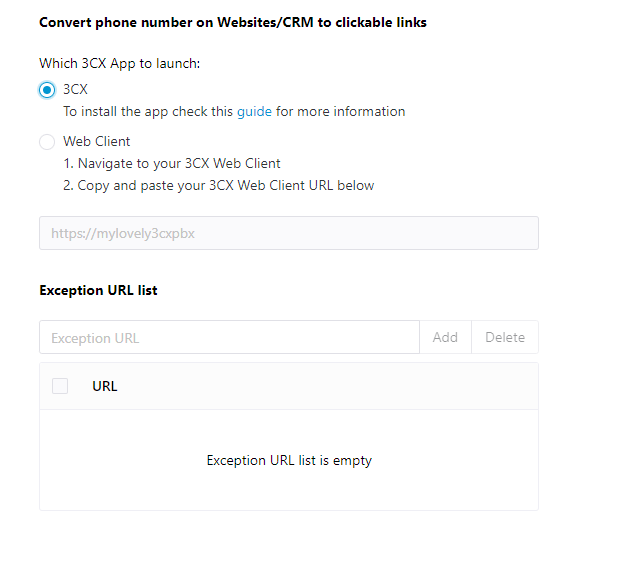
- Once installed the above screen will appear. Choose which 3CX app you prefer the browser extension to use to initiate calls; the Desktop App or the Web Client.
- In the “Exception URL list” field you can add specific website URLs that should not have their numbers “hyperlinked”. For example, you can exclude a website with accounting information, to prevent it from creating clickable numbers.
Making & managing calls
- To place a call, click on the dialer icon
in the top right corner of your web client.
- Enter the phone number or search by name, extension number or email address and then click the handset icon to start the call.

- Beneath the search bar you will see an option “Call using: Browser”. Click on the arrow and a dropdown will appear with available devices/apps for you to use to place calls.
- During a call, you can perform a number of actions:
- Transfer a call - Click on “Transfer” and enter the name or number of the person you want to transfer the call to. The call is transferred.
- Attended Transfer - Click on “Att.transfer” to announce the call to the receiver before transferring the call. The call will be put on hold.
- Start a conference call - Click on the “Conference” button and enter the name or number of the person/s you want to add to the call. They will be dialed and upon answering, they will be added to the existing call.
- Record a call - Click on the “Record” button at any point during your call to start recording. Click again to end the recording. Recordings can be accessed in the Web Client (if you have the required rights).
- Initiate a new call - Start a new call on a separate line without hanging up the current call. To do this, click “New Call” and enter the name or number of the callee.
- Switch to video - Switch your current audio call to a video call by clicking the “Video” icon in the dialpad.
Manage your status & queues
The Status feature allows you to see which colleagues are available to take calls. Avoid distractions and set your own status to let others know when you’re away or you don’t want to be disturbed.

- Click on your avatar in the top right corner and select your status from the dropdown.
- Your status color changes automatically to yellow when your line is busy.
- Use the pencil icon to set a custom status message.
- Time-limit your status by clicking on the “Set status temporarily” option.
- Click on “Settings” > “Call Forwarding”. From here you can customize each status and more:
- Enable/disable push notifications for each status.
- Rename “Lunch” and “Business Trip” statuses.
- Set the number of seconds before an unanswered call is forwarded for your “Available” and “Lunch” statuses.
- Set forwarding rules for unanswered calls.
- From the “Exceptions” option you are able to override forwarding rules based on Caller ID and time of the call.
- Set your office and break hours.
Auto switch status based on your working hours

You can configure automatic status switching based on your office hours from “Settings” > “Call Forwarding” > “Switch Status”. Choose whether your extension should use regular office hours or add your own. Your extension will then follow these hours and automatically change your status accordingly.
Add Caller ID Exceptions to your working hours
You can add caller ID exceptions to your working hours. This allows you to, for example, always accept a call from someone regardless of your working hours or never accept a call and send the caller straight to voicemail.
- From the left hand menu in your Web Client, click on the 3 dots > “Settings”.
- Now select “Call Forwarding” > “Exceptions”. From the Exceptions screen click on “+” to add a new exception.
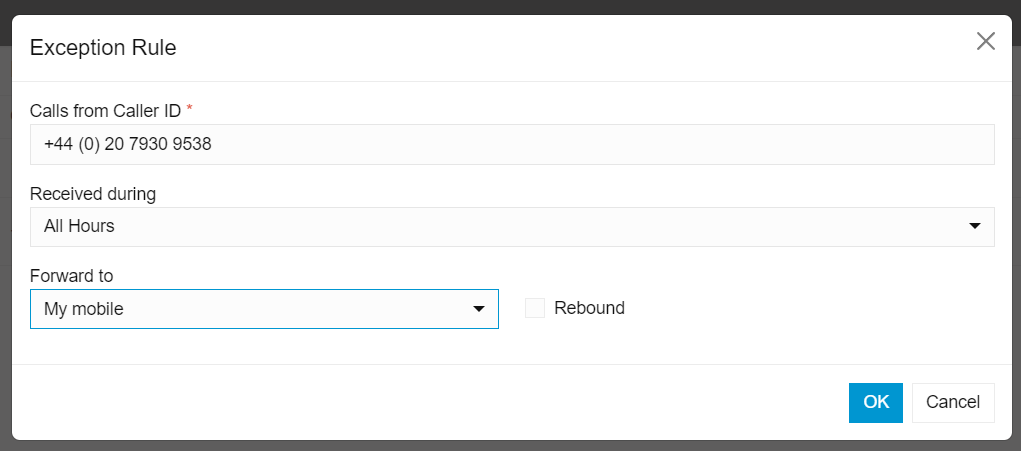
- Enter the caller ID you want to create an exception for.
- From the “Received During” drop-down menu choose which hours this exception is valid for. All hours, Break Time, Office Hours and so on.
- From the last dropdown, select where to forward calls to from your specified caller during your chosen hours. If you check the “Rebound” box, any unanswered “exception” calls will be automatically redirected to the extension that originally received it.
- Click “OK” to save the exception.
Team view - Depts & Groups

- By default, the “Team View” shows all the members of the groups you are part of. You can choose a different “View” from the top right drop down list, e.g. marketing, sales.

- Add colleagues to your “Favorite” list by clicking the star icon next to their name.

- The contacts toggle in the top left corner allows you to show your personal contacts also. They will be listed after your colleagues.
Chat with colleagues and customers
Send and receive instant messages with colleagues, live chat with website visitors, WhatsApp & Facebook, and receive SMS/MMS messages from customers. Access all chat functions from the “Web Client” > “Chat” option in the left-side menu.
Quick response chat templates are available to be created and edited by group managers. These allow users to respond with predefined messages making response times quicker. Templates can be split into different categories and languages.
Learn more about composing chats and SMS, and the various chat functions available in the business chat manual.
Start a video conference
Start a video conference or schedule a conference by clicking on the “Meet” option in the left-hand menu of your Web Client.